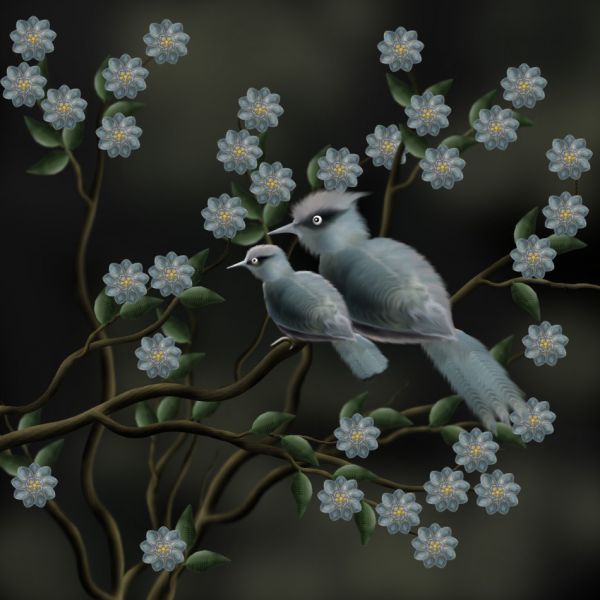
In this tutorial i will show how to create a beautiful birds and flower in Photoshop It's a very simple creation. So why not have a look...
Step 1
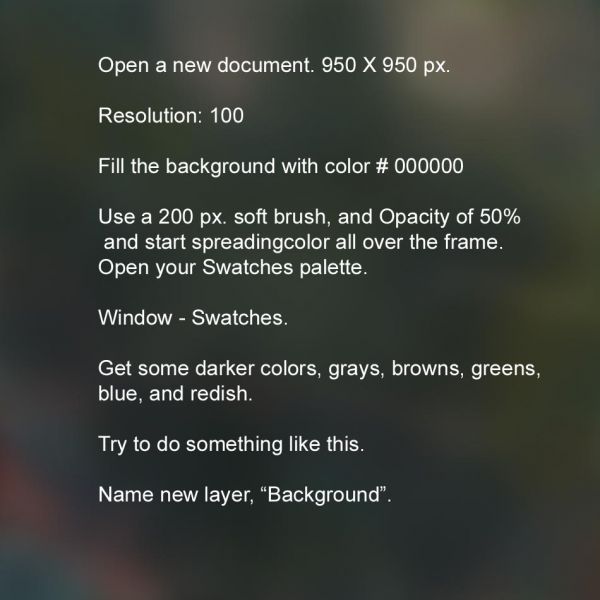
Open a new document. 950 X 950 px.
Resolution: 100.
Fill the background with color # 000000.
Open your swatches palette.
Window - Swatches.
Pick some browns, reds, dark greens, gray, blue and ochres.
With a 200 px size soft brush, and opacity of 50%, start spraying all around the frame. Use different colors at some spots.
Name new layer, "Background".
Step 2
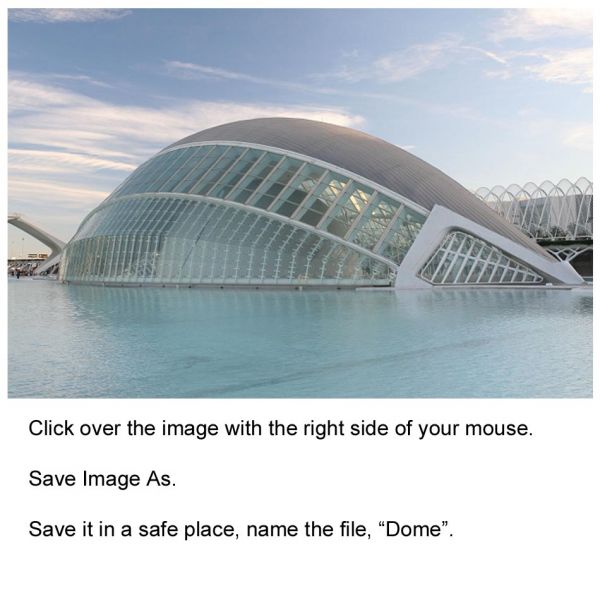
This is the image, provided by pxleyes, that we are going to be working with.
Click over the image with the right side of your mouse.
Save Image As.
Give the file this name, " Dome". Save it in a safe place where you can have access to it, as we'll use it.
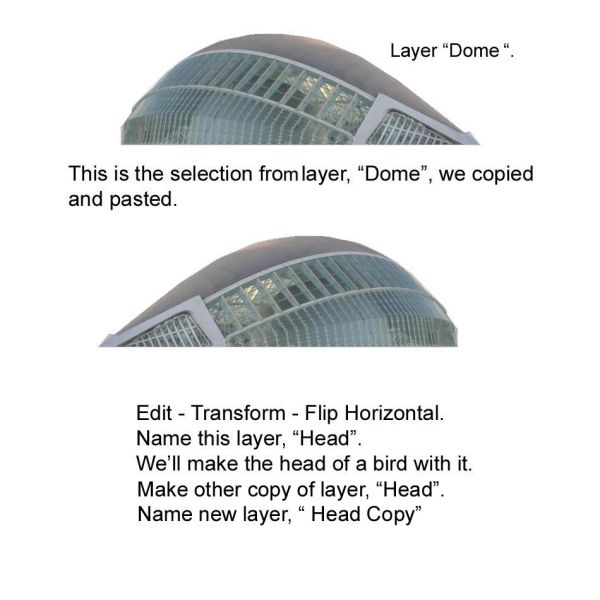
Step 3
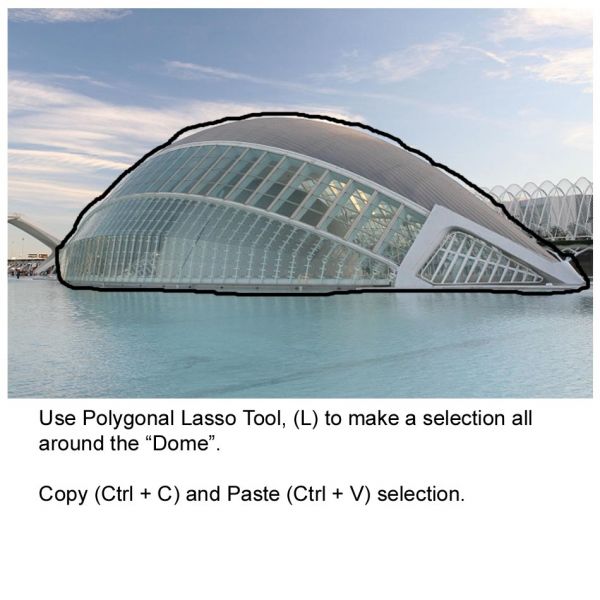
Use the Polygonal Lasso Tool (L), to make a selection all around the dome.
Copy ( Ctrl + C) and Paste ( Ctrl + V), your selection.
Step 4
Name new layer, "Head".
Edit - Transform - Flip Horizontal.
We'll be making the head of a bird with this shape.
Make other copy of layer "Head", name it, "Head Copy".
Step 5
We'll transform the shape of the dome, into the head of a bird.
Use Filter - Liquify - Warp.
Brush size: 100.
Presure of 50.
Try to make the shape as I did. (Shown in image).

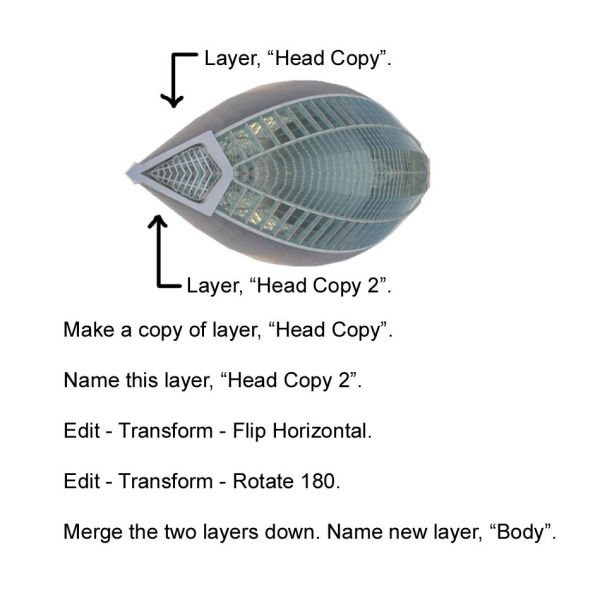
Step 6
Make a copy of layer, "Head Copy".
Name new layer, "Head Copy 2".
Edit - Transform - Flip Horizontal. (Layer "Head Copy 2" only.
Edit - Transform - Rotate 180.
Place, and merge the two layers together. Name new layer, "Body".
This will be the body of our bird.
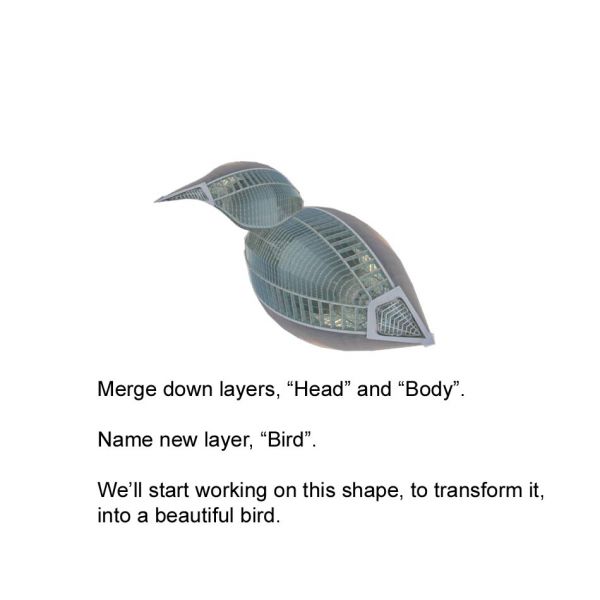
Step 7
Merge down layers, "Head" and "Body".
Name new layer, "Bird".
We'll transform this shape, into a beautiful bird!
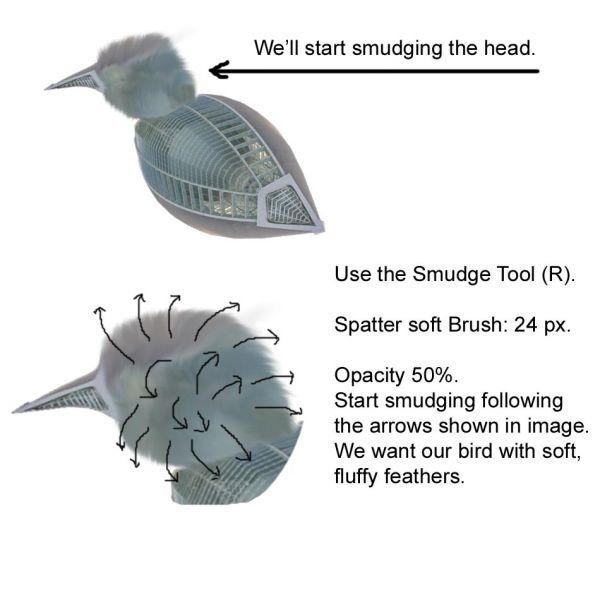
Step 8
How the head is smudged.
Use the Smudge Tool (R).
Spatter 24 px soft brush.
Opacity of 50%.
Start smudging the head, by making kind of half circles strokes, as shown in image.
Birds have soft, and fluffy feathers. You can go back and smudge again, if necessary.
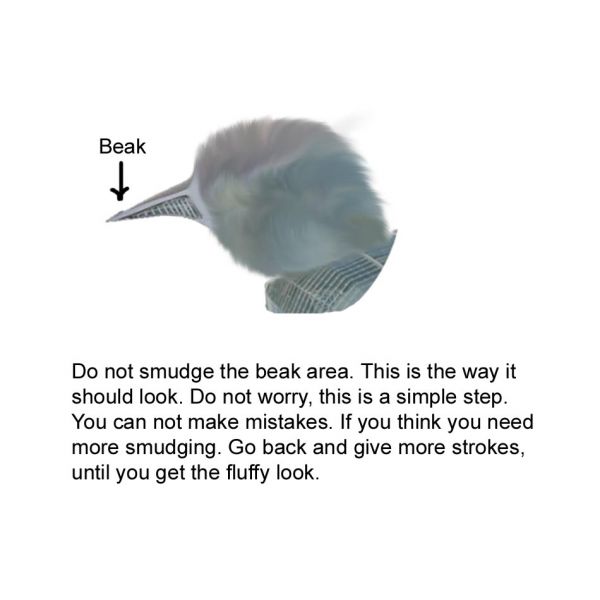
Step 9
If you follow the direction of the arrows, while smudging, you should have something like this.
Remember, that smudging is easy, it is the process of blending colors to give a look of softness. As I mentioned before, if you have trouble smudging, go back and start smudging again, at the end, you'll be happy with the result.
Do not smudge the beak area yet.
Step 10
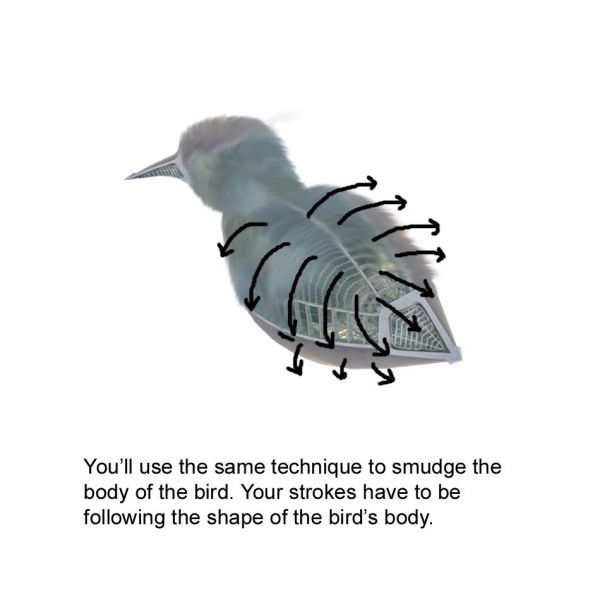
Follow the shape of the bird's body, to smudge all of this area.
The arrows shown in image, show you the direction of your strokes.
Step 11
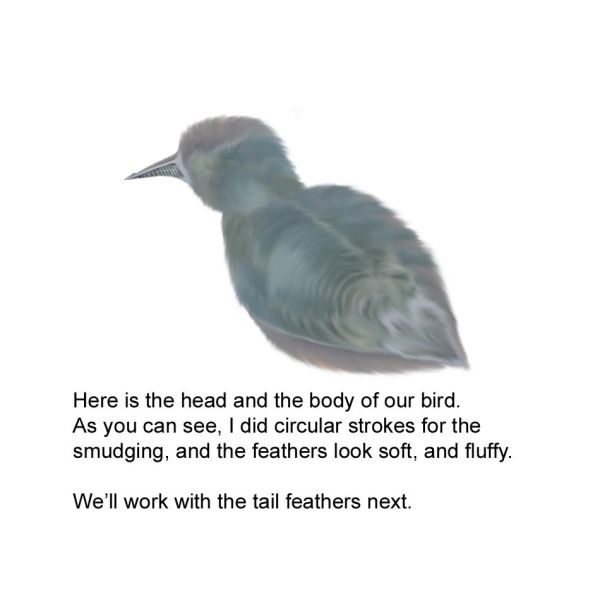
Here is the head and the body of the bird. As you can see the smudging, gave the bird's body a fluffy and soft look.
We will work on the tail fathers next.
Step 12
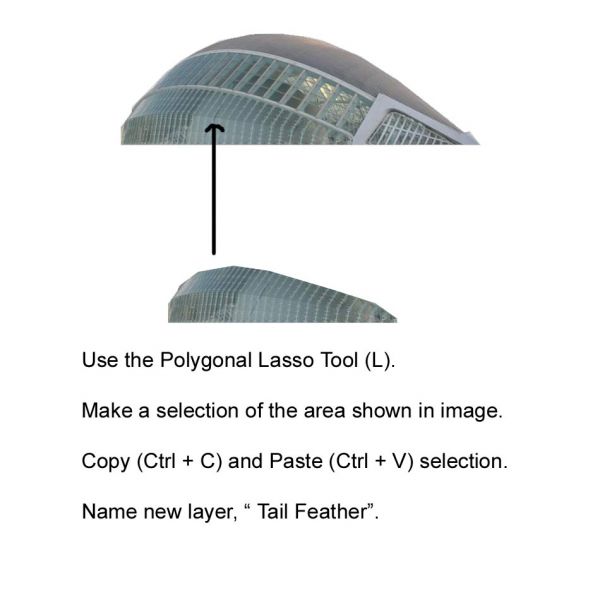
Use The Polygonal Lasso Tool (L).
Make a selection of the shown area.
Copy ( Ctrl + C) and Paste (Ctrl + V) selection.
Name new layer, "Tail Feather".
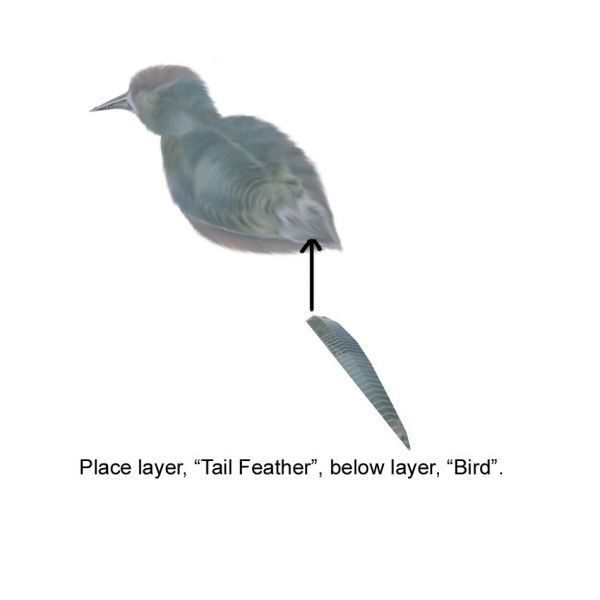
Step 13
Place layer, "Tail Feather" below layer, "Bird".
Step 14
Smudge the feather, the same way you did with the bird's body. Leave some white lines visible.
Make two more copies of layer, "Tail Feather".
With layer, "Feather Tail", selected, place the pointer over the object (feather), click and hold Alt, drag the object to the right side, and you'll have a copy of a feather. Do it again.
Do not name new layers, drag them down to layer, "Tail Feather" and name the new layer, "Feathers".

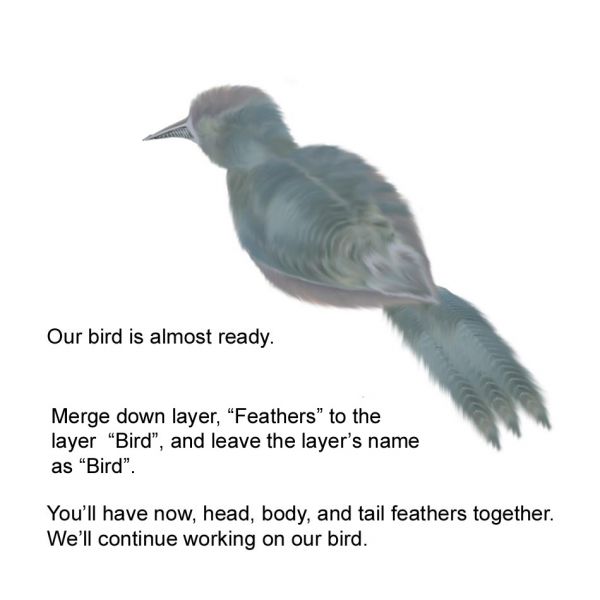
Step 15
Our bird is almost ready.
Merge down layer, "Feathers" to layer, "Bird".
Name new layer, "Bird".
The head, the body, and the feathers are in place, we'll continue working on our bird.
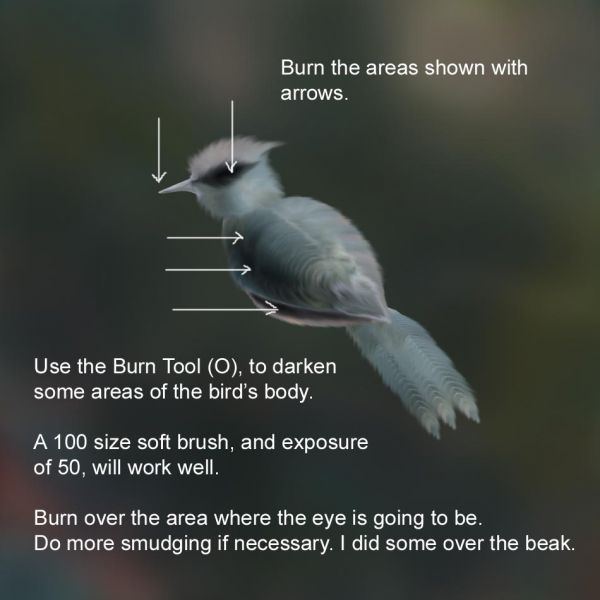
Step 16
Use the Burn Tool (O), to burn the areas shown with arrows.
Use a 100 px soft brush, and exposure of 50%.
You can darken the areas around the area where the eye is going to be.
Use the Smudge Tool (R), and smudge the beak, just a little.
Step 17
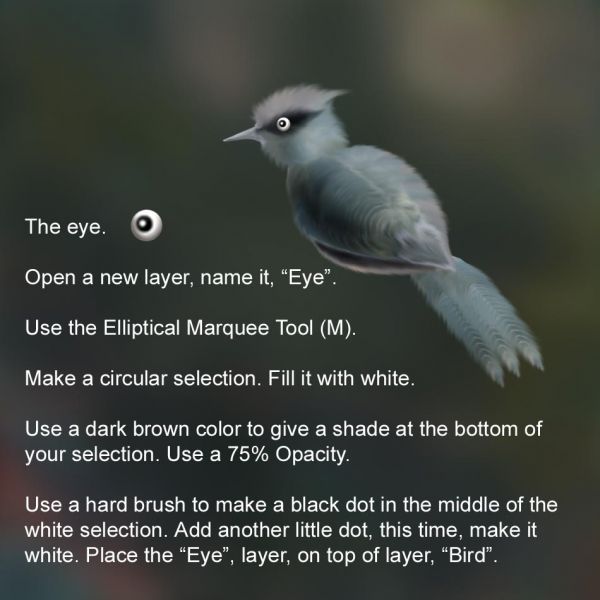
The eye.
Open a new layer, name it, "Eye".
Use the Elliptical Marquee Tool, (M).
Hold Shift, and make a circular selection. Fill it it white.
Use a dark brown color, to give a little shade at the bottom. Use a 75% Opacity.
With a hard brush, make a black dot on top of it. Do the same for a highlight, but for this, instead of black, use white color. Place the eye on top of the bird.
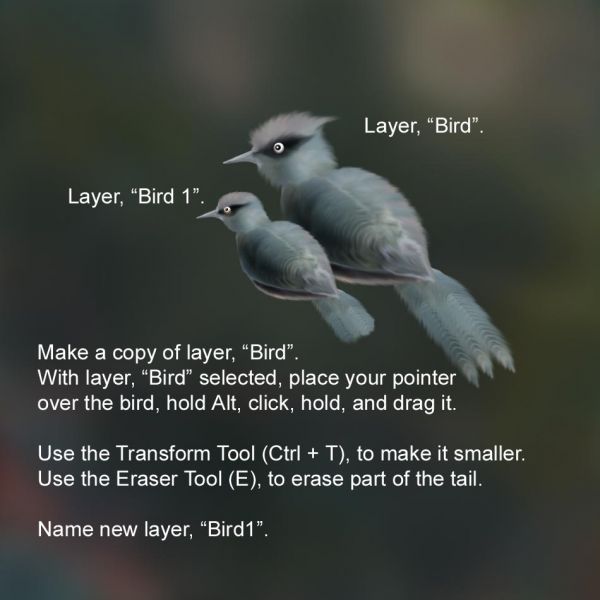
Step 18
Make a copy of layer, "Bird".
With layer, "Bird", selected, place the pointer over the bird, hold Alt, and click, hold and drag it to the right to make a copy of the layer.
Use the Transform Tool (Ctrl + T), to make the new layer, smaller.
Use the Eraser Tool (E), to erase part of the tail.
Name new layer, "Bird 1".
Step 19
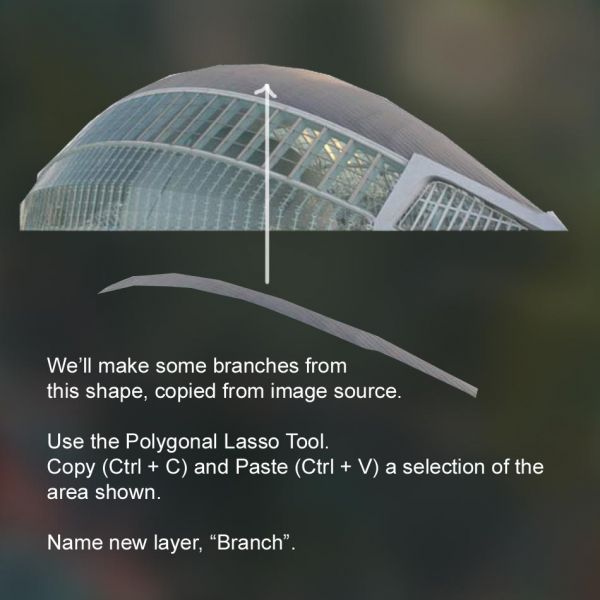
We'll now create the branches.
Use the Polygonal Lasso Tool (L). Make a selection of the area shown in image.
Copy (Ctrl + C) and Paste (Ctrl + V) selection.
Name new layer, "Branch".
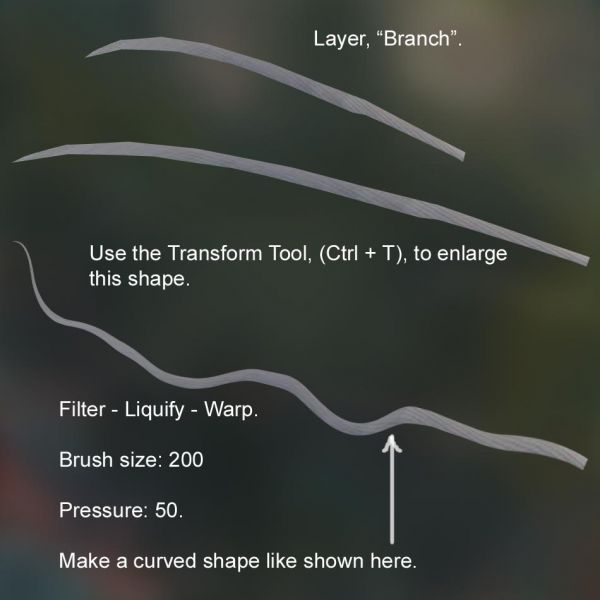
Step 20
Look at the image below. It shows you the way to make a branch.
Use the Transform Tool (Ctrl + T), to enlarge layer, "Branch".
Use Filter - Liquify - Warp.
Brush size 200.
Pressure 50.
Make a shape as I did. You can make a shape of your own, as you know, branches are different, and easy to make.
Step 21
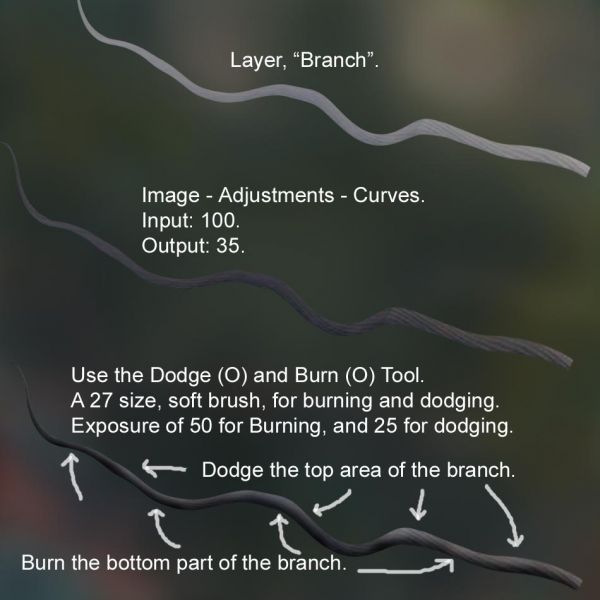
Darkening the branch.
Use Image - Adjustments - Curves.
Input: 100.
Output: 35.
Use the Dodge (O) and Burn (O) Tools.
With a 27 size, soft brush, do the dodging and burning.
Use a exposure of 50 for burning and 25 for dodging.
Dodge the top area of the branch, and burn the bottom.
Step 22
Make several copies of layer, "Branch".
The reason I do not ask you, how many branches you can copy, it is because, I would like you to use your own imagination here. Trees, have branches everywhere. I am guiding you to show you how to make them.
Use the Filter - Liquify - Warp tool to make the branches a little different.
Use the Transform Tool, (Ctrl + T), to make smaller branches, like twigs.
When you are happy with it, merge all the copies of layer "Branch" you must have, bring them down to merge with layer, "Branch" , and leave the name of layer, "Branch".
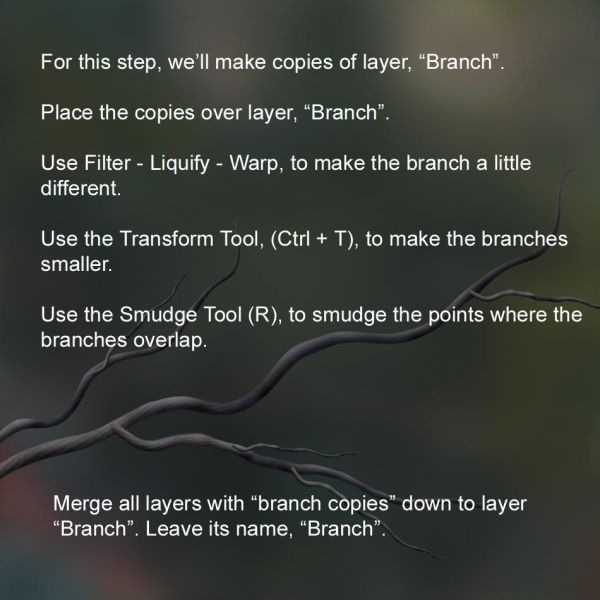
Step 23
Smudge the areas where two branches overlap.
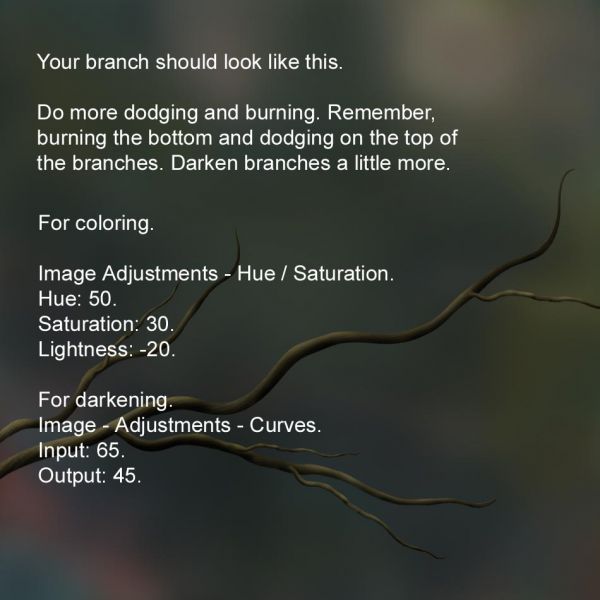
Do more dodging and smudging if you think it is needed.
Coloring the branch.
Image - Adjustments - Hue and Saturation.
Hue: 50.
Saturation: 30.
Lightness: - 20.
To darken the branch.
Image - Adjustments - Curves.
Input: 65.
Output: 45.
Step 24
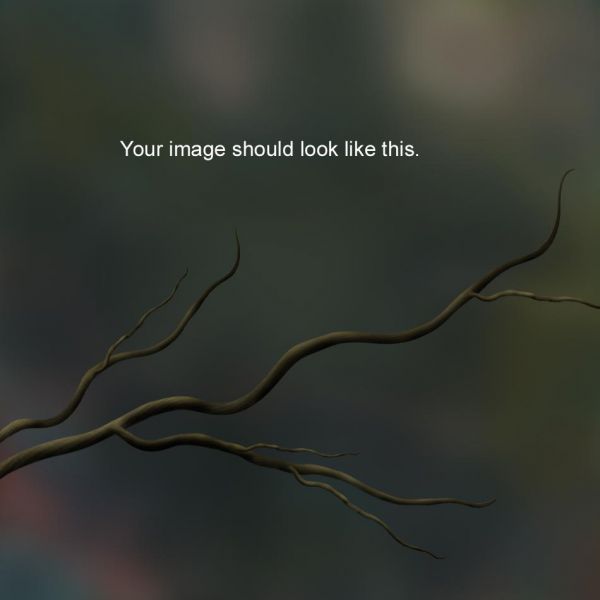
Your branch should look like this.
Step 25
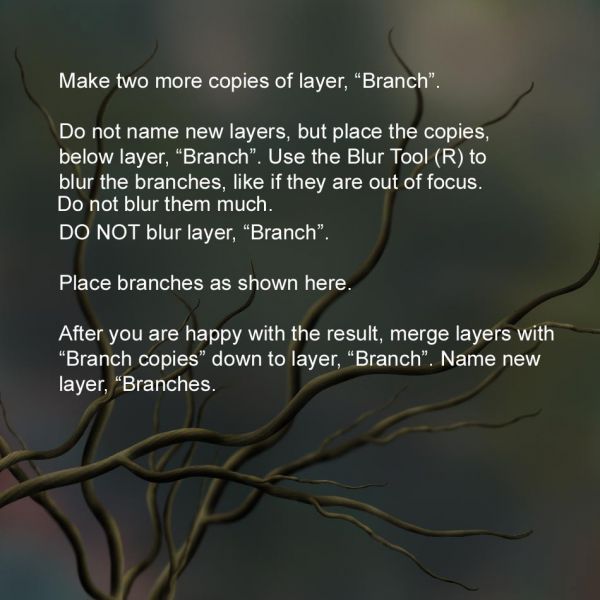
Make two more copies of layer, "Branch". Do not name the new layers. Place them below layer, "Branch".
Blur the new layers just a little, not much. It'll give the impression of being out of focus. Place the new branches as shown in image. You can place your branches, as you think they look nice in your work. I am just giving you an idea.
After you are happy, merge the copies of layer "Branch", down to layer, "Branch" itself. Name new layer, "Branches".
Step 26
You should have something like this.
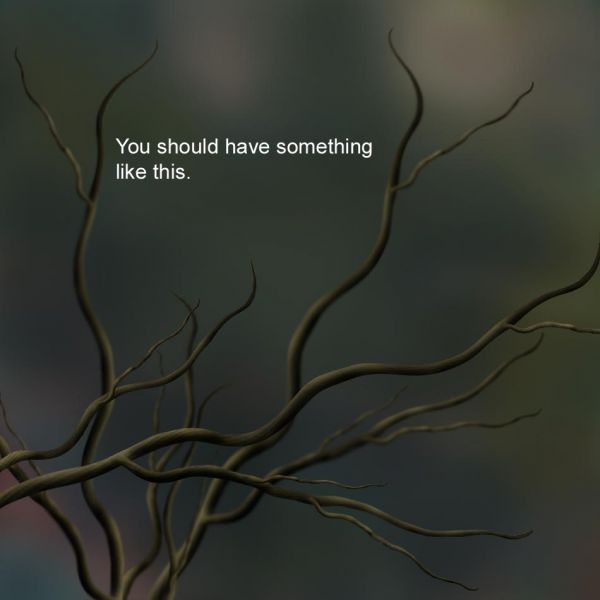
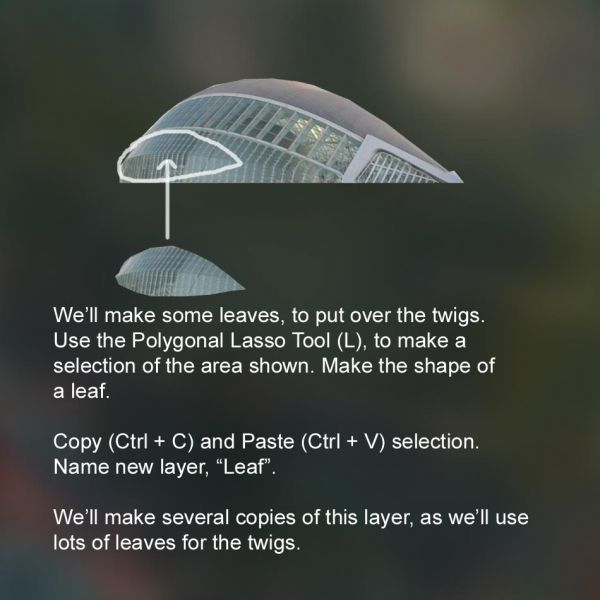
Step 27
Use the Polygonal Lasso Tool (L), to make a selection of the area shown in image.
We'll make some leaves from this shape.
Copy ( Ctrl + C) and Paste (Ctrl + V) selection.
Name new layer, "Leaf".
We'll make several copies of this layer, as we'll need some leaves, for the twigs.
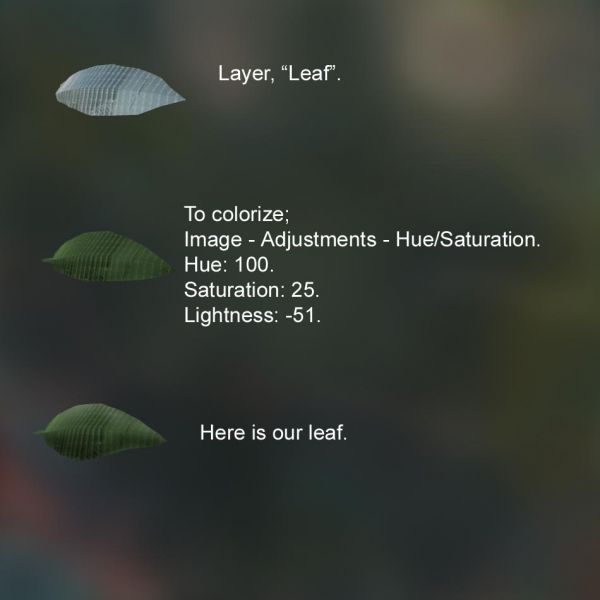
Step 28
To colorize the leaf.
Image - Adjustments - Hue and Saturation.
Hue: 100.
Saturation: 25.
Lightness: - 51.
Here I go again: "If you have a better idea of how to make your own leaf and coloring, do it, do not hesitate, I'll be happy to know that you have learned something, from looking at our tutorials".
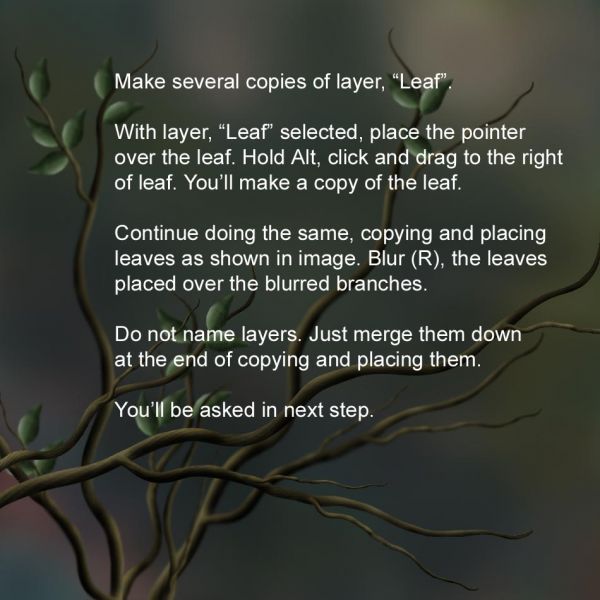
Step 29
Making several copies of layer, "Leaf".
With layer selected, place the pointer over your leaf, hold Alt, click, and drag the leaf to the right, you'll have a copy of layer, "Leaf". This copy, will come with many other layers, names, "Leaf Copy 1, 2 , 3 4, etc..." Do not worry about that, do not name layers. Start placing your leaves over the branches. I am giving you an idea how to place them, you can make your branches look better.
Blur, a little, the leaves places over blurred branches.
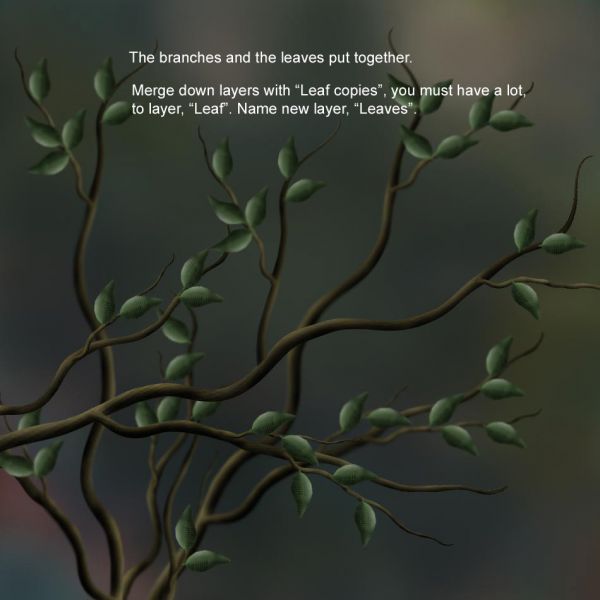
Step 30
Here, you have your branches and leaves put together.
Merge down all layers with "Leaf Copies" on it.
Name new layer, "Leaves".
Step 31
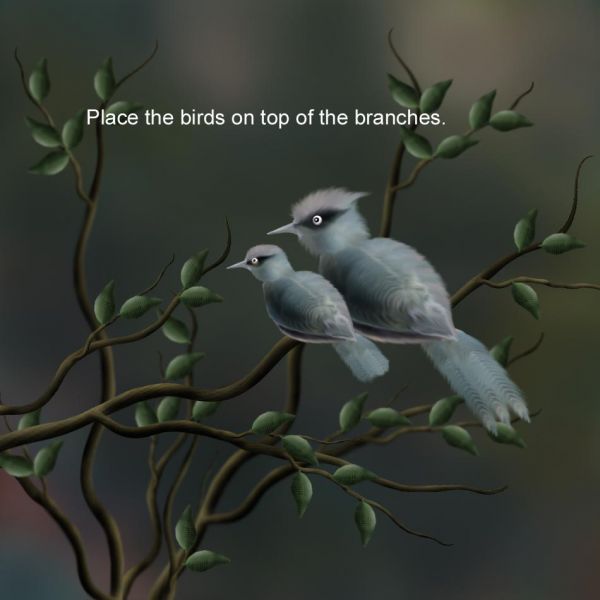
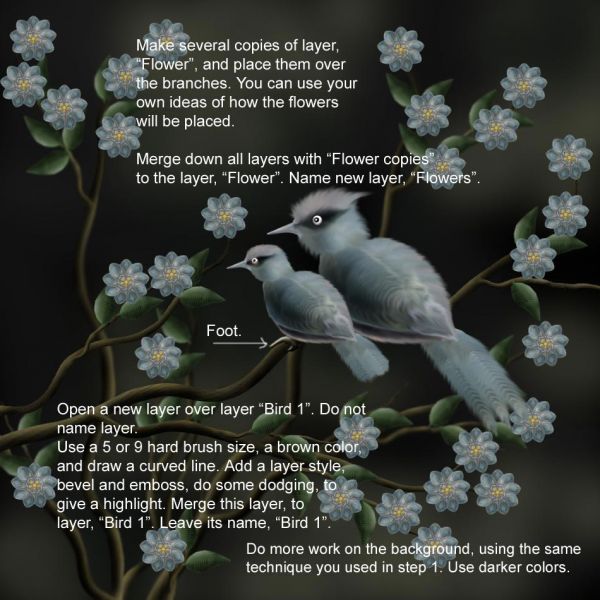
Place your birds on top of the branches.
Step 32
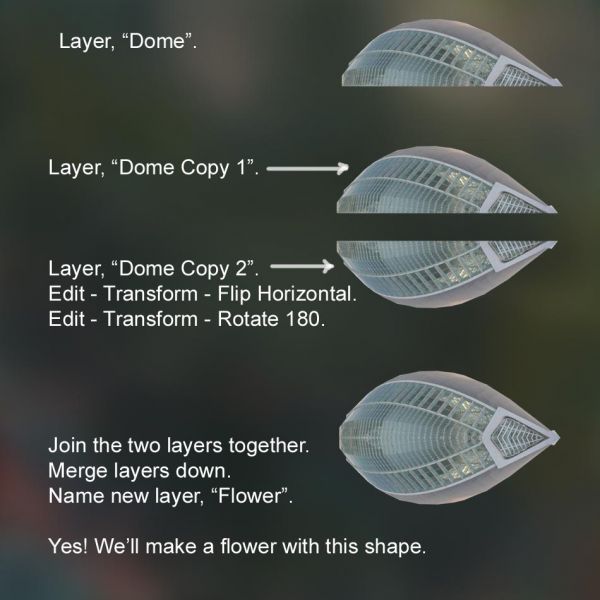
We'll start making the flower.
Make of copy of layer, "Dome Copy 1".
It will give you a new layer, "Dome Copy 2".
Edit - Flip - Horizontal, layer," Dome Copy 2".
Edit - Transform - Rotate 180.
Join the two layers together.
Merge layers down, to form one layer, name it "Flower".
We'll make a flower with this shape!
Step 33
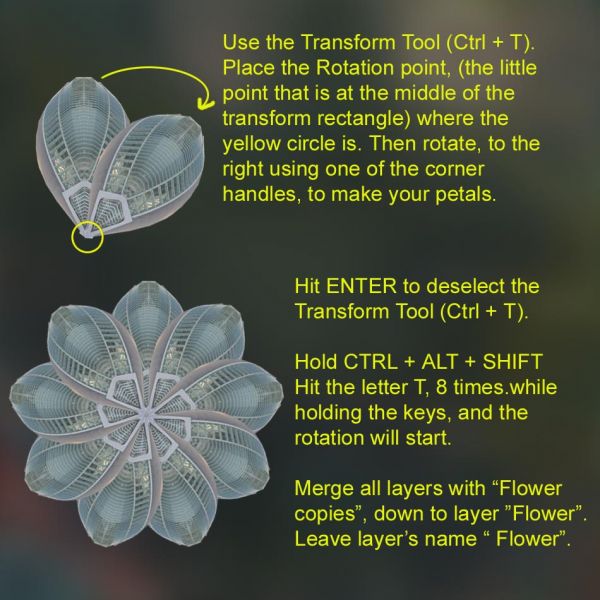
The next two steps are VERY IMPORTANT to start making the flower.
I do not want to confuse you, by writing again, what is aready written over the image. Just follow the instructions, and make your flower as pretty as you can. You will use the transform tool, to make the rotations. Be careful when you place the Rotation point, the one that is at the middle of the Transform Tool (Ctrl + T). Good luck.
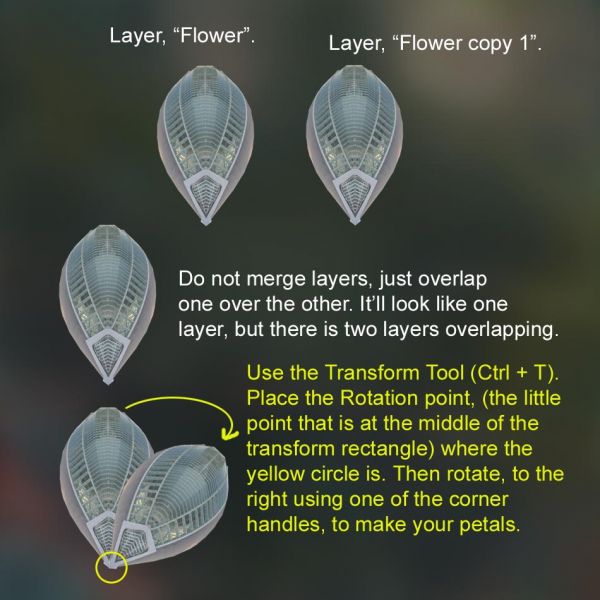
Step 34
READ this step CAREFULLY, as you did before.
As I told, you, it is important where you place the Rotation point, and the distance between a petal and the next.
Merge down layers with "Flower Copy 1, 2, 3, 4, etc" name new layer, "Flower".
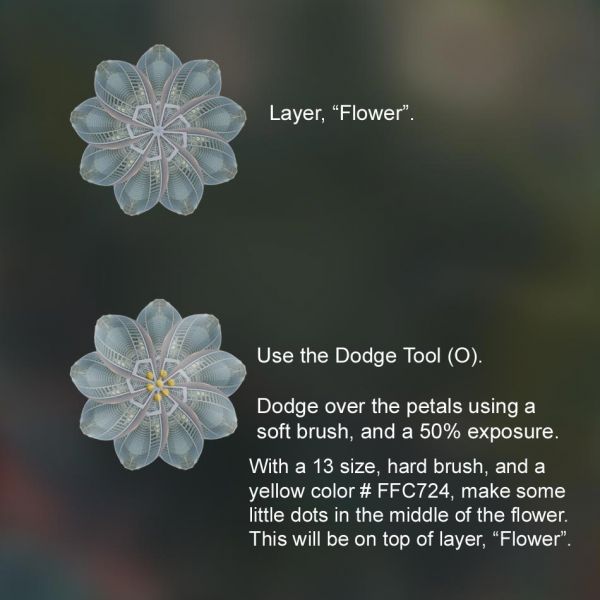
Step 35
Use the Dodge Tool (O), to give some highlights to the flower.
Do not dodge it much.
Use an exposure of 50.
With a 13 size hard brush, and color # FFC724 (yellow), make some little dots in the middle of your flower.
Step 36
For this last step, you will be placing the flowers. You'll will also make several copies of layer, "Flower", as you did with layer "Leaf".
To finish this step, READ CAREFULLY again the directions given in the image. It should not be hard for you to finish the image. I sure appreciate your patience.
Step 37
This is the end of my tutorial. I appreciate your willingness to learn, and to get new ideas from our tutorials here at pxleyes. It is wonderful to see people reading, and taking the time to follow us in a step by step journey through something new, and beautiful.
If there is any questions about steps that you do not understand, or something related to photoshop work, ask, I, myself, as well as members of pxleyes, will help you. So, do not hesitate, and I hope you enjoyed this tutorial as I did, teaching you.
Hope you can learn something new from this tutorial.
I feel really glad if you give me feedback through comment below. Soon i am going to show more interesting & innovative tutorials so please keep visit our blog. That’s for now.
Have fun!
Feel free to contact with Clipping Design for clipping path service, image editing service, image masking service or any kind of design support.
Thank you…
Credit. pxleyes.com
No comments:
Post a Comment