
Today i want to present how to place a couple of squirrels in a coffee mug that is floating in a body of water.We use Photoshop technique to create this tutorial. So let's get start...
Tutorial Assets
The following assets were used during the production of this tutorial.
- Gray Squirrel image
- Lake background image
- Red Squirrel
- Faroese Hat
- Top Hat
- Kitchen Tools – Flour shaker
- Flag – included in Source folder
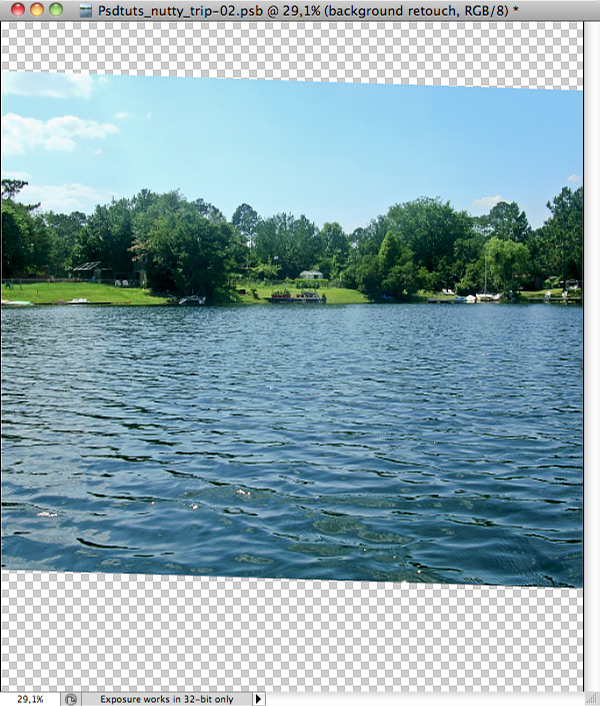
Step 1 – Lake Background
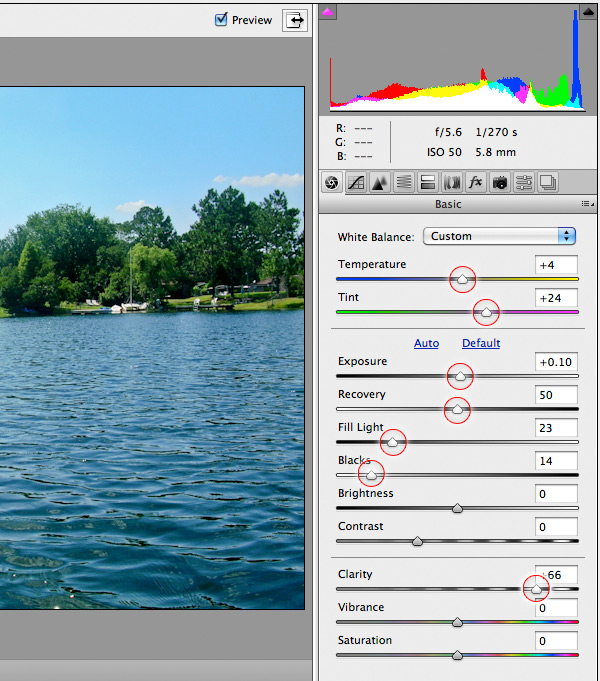
We’ll start by preparing our downloaded images for the project, for this we’ll start by using the Camera Raw plugin in Adobe Bridge. Note I’ll be using CS5 for this Photoshop Project. Select the background image file "112044770416.jpg" in Adobe Bridge and open it in Camera Raw plugin Command/Ctrl + R.
We’ll start by adjusting the white balance in the photo, so set the Temperature to + 4 and Tint + 24. I’ve set the exposure to + 0.10 and recovery to 50, to dim the brightness areas. I’ve also added 23 fill light to lighten the dark areas and 14 black to add contrast to the image. Also I’ve added + 66 clarity to the photo to add a overall sharpness.
Step 2
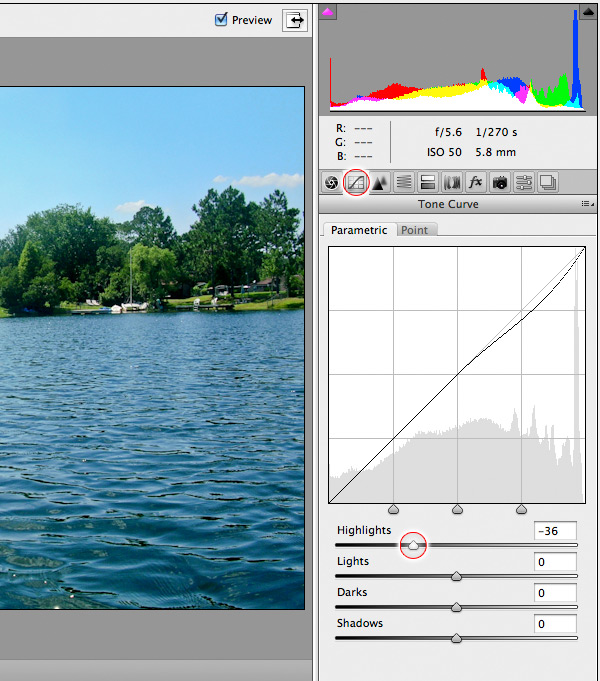
I’m not quite pleased with the highlight in the sky since it’s a bit too bright, so we’ll turn it down via the Tone Curve feature in Camera Raw. I’ve set the highlight to -36 and now it’s time to continue working with it inside Photoshop.
Step 3
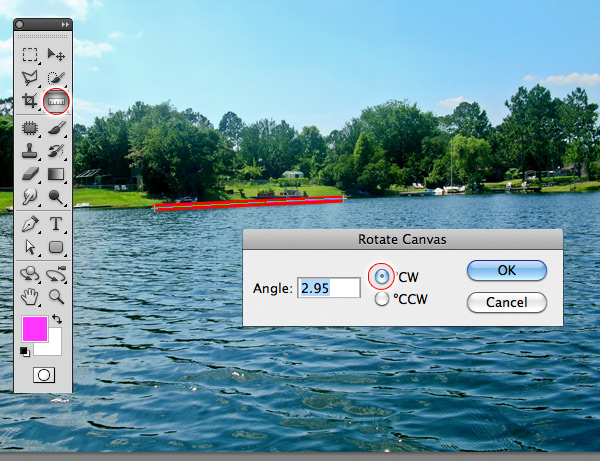
The first thing we’ll do in Photoshop, is to unlock our background layer by double clicking the layer, in the Layers palette. A new layer window prompt will appear and set the Name to Background, click ok when done. Reason for this is we are going to adjust the horizon and need a layer with transparency. Select the Ruler tool from the tool palette and place the lines as shown in my screenshot, I’ve chosen the coast as horizon. After placing your Ruler line on the coast, go to the top menu under Image > Image Rotation > Arbitrary. A dialog window will appear with a rotate value based on your Ruler tool line, select OK. The background is now ready to be placed in a new canvas, so select the whole scene Command/Ctrl + A, and copy the content to the clipboard Command/Ctrl + C.
Step 4
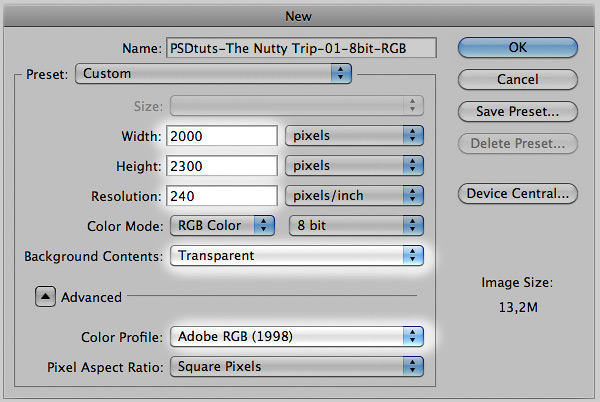
Now let’s create a new document which will be our main project file, I’ve set my document size to 2000×2300 pixels at 240 PPI, I’ve chosen Adobe RGB color spectrum and set Background Contents to "Transparent". We want to use the lake background we correct earlier, so just Paste the background from the clipboard onto the scene Command/Ctrl + V.
Our Background is much larger than our canvas, so we’ll need to decrease it with the help of the Transform tool Command/Ctrl + T. Note if you hold down the Shift key while scaling, it’ll scale the object proportionally. You can see on my screenshot how my outcome looks like. As you can see, I’ve left some space above and below, because it’s time to play with cloning features.
Step 5
Before we’ll start cloning the photo, I want to make a copy of my layer, just in case if something goes wrong, and I do like to compare before/after and have a backup. Go to your Layer palette and choose the background layer, and use the shortcut Command/Ctrl + J to duplicate, rename the new layer “Background Retouch”.
We’ll focus on the lower half first, so we need make a layer selection by Command/Ctrl + mouse click on the layer. The layer content is now selected, but we have to invert the selection by either using Command/Ctrl + Shift + I or right click on the canvas, and choose Select Inverse. Your selection should now cover everything, but the layer content.
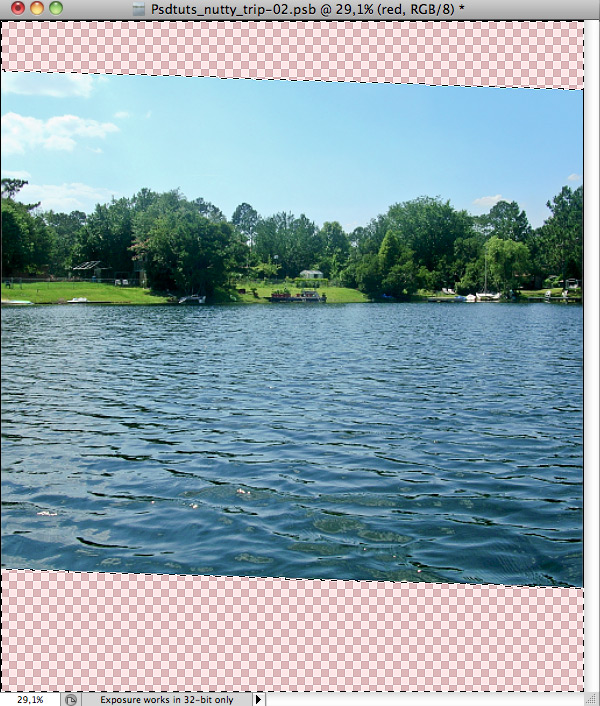
Step 6
Since we are only focusing on the lower half, we need to deselect the upper selection. So select the Rectangular Marquee tool from the tool panel (shortcut M) and mark the upper selection while holding ALT key down, this allows the tool to deselect mark selections. Now we should only have a selection of the lower half and it’s time for cloning.
Step 7
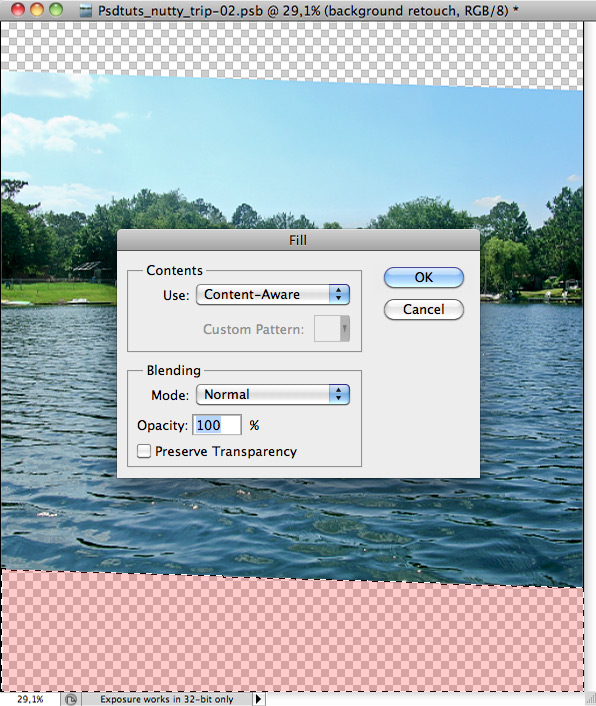
With the lower half selected we’ll use the nice fill feature within Photoshop CS5, named Content Aware fill, which can be access from the top menu edit > fill or Shortcut Shift + F5. A Fill dialog window should appear and now select Content Aware from the drop-down and click OK.
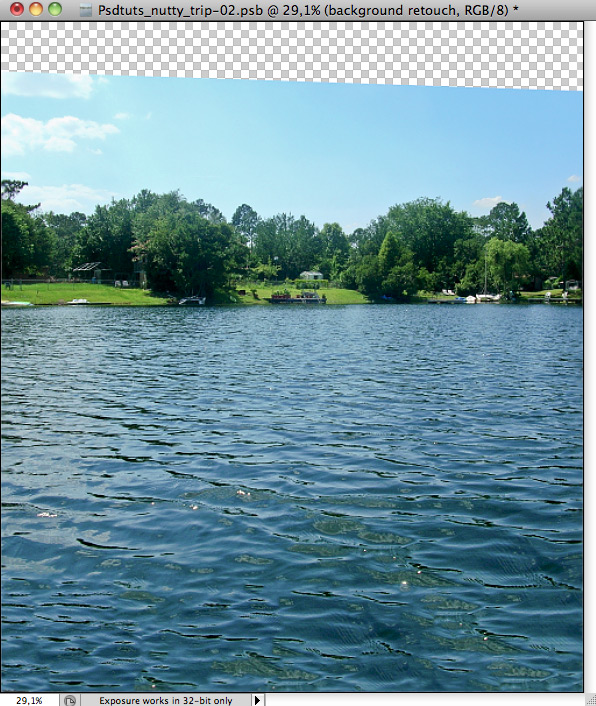
Results will vary from each try you do, and if your not pleased with the first try, you can always retry the Content Aware fill. It doesn’t have to be perfect result, because most times there will appear duplicates in the water, which we can fix with the help of the Clone tool (Shortcut S). When you’re pleased with the cloning result, we’ll focus on the skies above.
Step 8
Since we are going to use the Content Aware fill option again for the skies, we’ll need to do some preparation first. Reason for this is the Content Aware fill uses the visible content in your layer to make it’s magic, and if you don’t exclude the area you don’t want to use, you can end up having a tree or something else hanging in thin air.
So instead of making a new layer, which contains the content we want to use for Content Aware auto cloning, we’ll instead use a simple trick. We’ll be using the Masking feature in Photoshop to hide the unnecessary content. Reason for using the Mask to hide, is that content-aware only work with what is visible on the canvas, so no need to delete or duplicate pixels.
Make a selection only containing the air and then use the Mask button in the layers palette to make a Mask containing only the selected area. Afterwards Command/Ctrl + Click on the layer preview icon, to make a new selection and Inverse it. Now it’s time to apply the Content Aware fill.

Again if your not pleased with the result, try again or just clone the area not pleased with. When finished, remove your Mask from the layer by dragging the Mask into the trash icon in the layers palette. A dialog will appear and choose delete option to remove the Mask.
Step 9
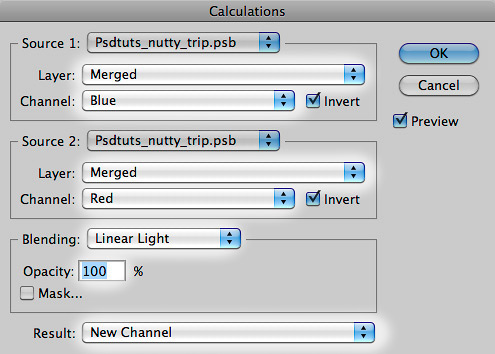
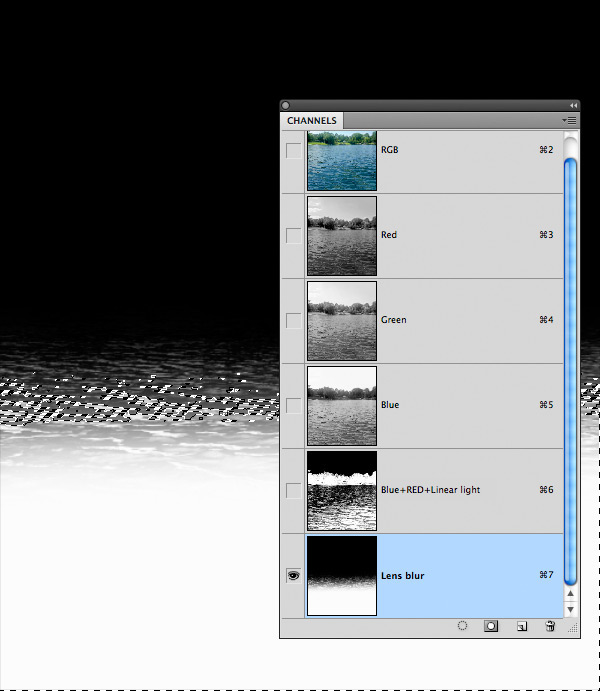
Since we are going to have our furry friends in the foreground of the canvas, we want to move the focus away from the landscape to the front, so we are going to fake a Lens Blur effect. To do a Lens blur effect, we need to create a Channel first, and we’ll do so by applying a feature called Calculations. for making a custom channel.
First step is to go to the top menu and choose Image > Calculations. and we’ll have a dialog with different options. For my Lens blur channel, I’ve choose to set the Source 1 as default, which is our canvas project. Source 1 Layer is set to Merged and for the Channel I’ve chosen the blue, since it contains most of the highlights and set it to Inverted.
For source 2, we have to set it to Merged and for this channel I’ve chosen the Red channel, since it contains most contrast and set it to Inverted. The Blending of these two channels I’ve gone for a “Linear Light” to combine both and give the photo a contrast boost, and I’ve set the opacity to 100%. Click OK to accept the settings.
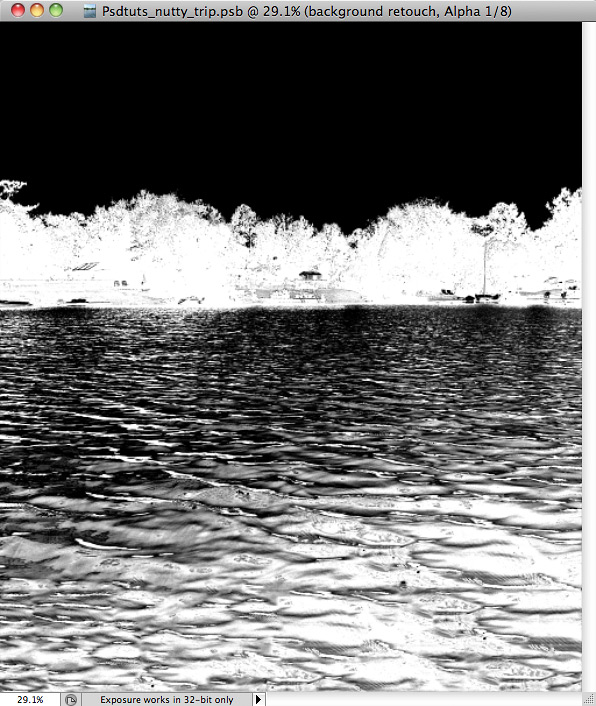
Now go to your Channels window, and look for the new Channel Alpha 1, it should look similar to the screenshot. Let’s rename it to Blue + RED + Linear light, just so we know what settings we used for it later on, since Alpha 1 doesn’t say much. The fun” doesn’t end here, it’s time to use the brush to adjust the channel for our filter.
Step 10
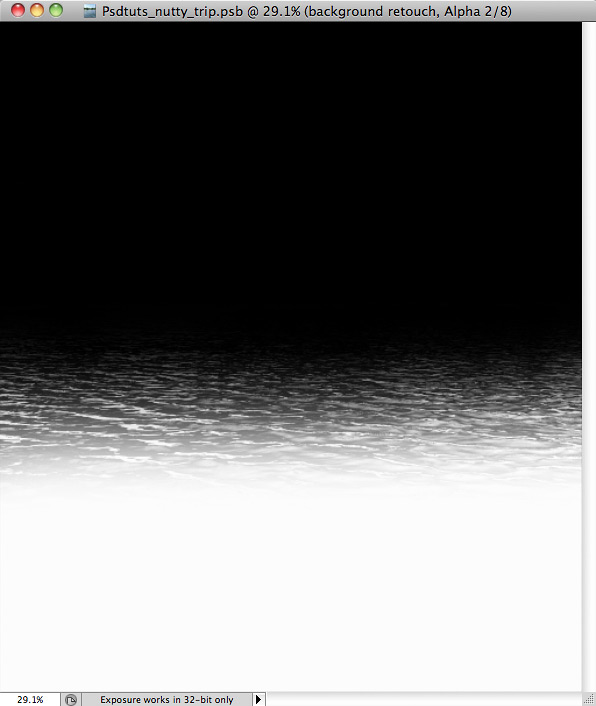
First duplicate our newly created alpha channel Blue + RED + Linear light and name it Lens Blur, we want to keep the original one for later use. Select the Brush tool and choose a large brush, about 1000px and set brush hardness to 0% and set it to 100% black.
Paint the top of the channel with black color, this area will be a 0% area, and be blurred in the Lens Blur filter. When done, we’ll paint the lower half with 100% white, this area will be sharpest area of the photo.
See the attached screenshot, and try do a similar result
Step 11
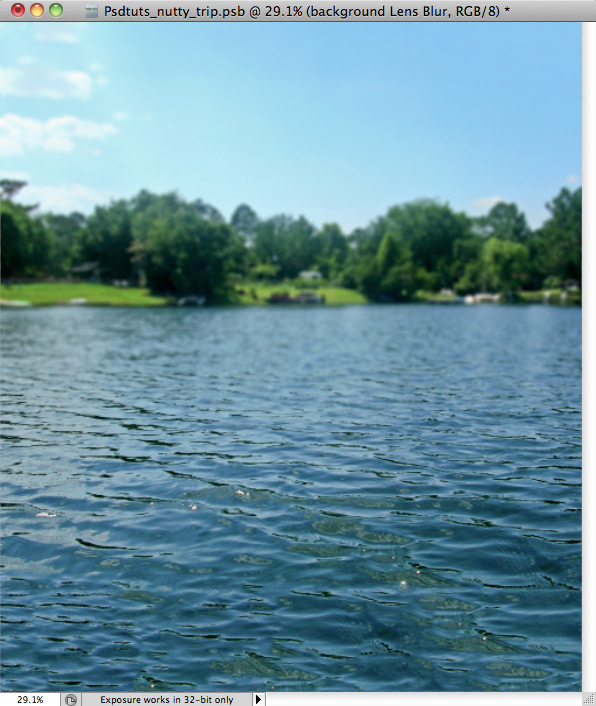
Our channel is now ready and it’s time to play with the Lens Blur Filter, and we’ll perform it on a duplicated layer of background Retouch and name it background Lens Blur. Select the duplicated layer and go to Filter menu and choose Blur > Lens Blur and a dialog window will appear.
Settings are shown on screenshot and notified in the text.
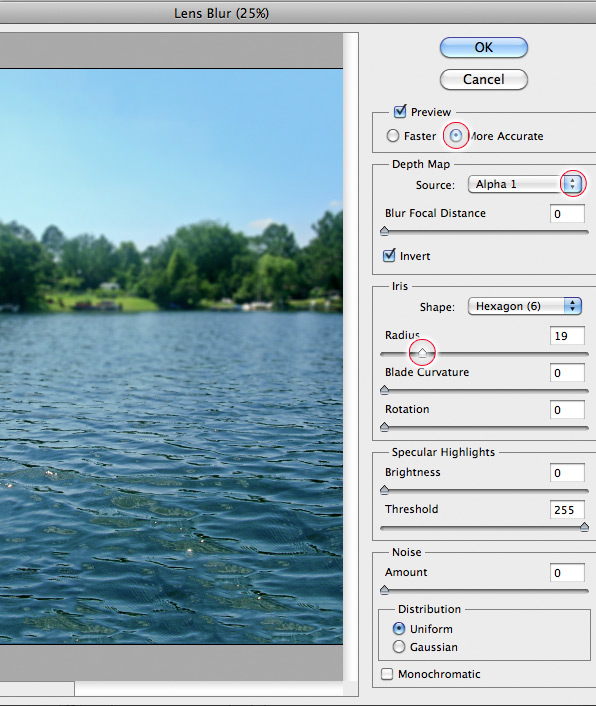
Under Depth Map: Source, we’ll choose the Custom channel we created and select alpha channel Lens Blur. Leave Blur focal distance at 0, and let Inverted be checked.
Under Depth Map: Source, we’ll choose the Custom channel we created and select alpha channel Lens Blur. Leave Blur focal distance at 0, and let Inverted be checked.
Under Iris, Shape is set to Hexagon (6), Radius at 19, Blade Curvature 0, Rotation 0.
Specular Highlights: Brightness 0, Threshold 255, Noise: amount 0, Distribution: Uniform, Leave monochromatic unchecked.
Specular Highlights: Brightness 0, Threshold 255, Noise: amount 0, Distribution: Uniform, Leave monochromatic unchecked.
The background has now a Lens Blur filter applied and is ready to have the remaining elements added.
Step 12
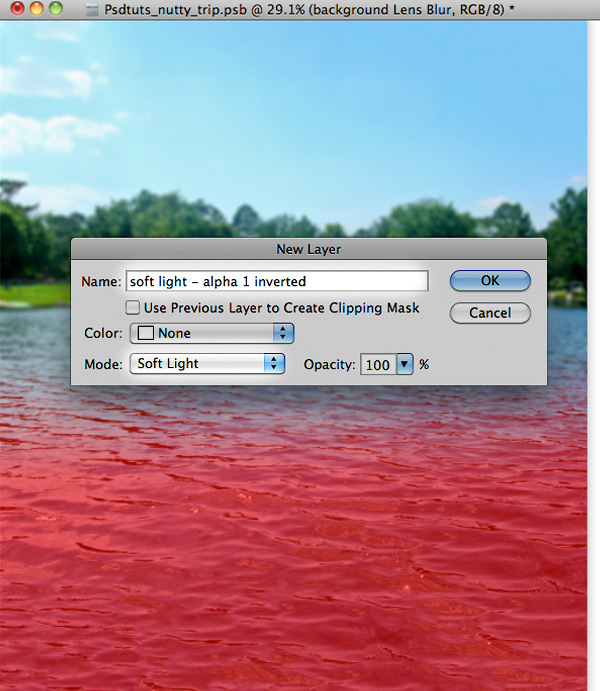
There are two more things I want to adjust with the background, before we’ll focus on our furry friends and their fancy boat & Accessories. I want to brighten up the upper half of the background and we’ll do so by applying a Gradient Fill layer.
We’ll need to use the Lens Blur channel we created for the new Gradient fill layer Mask. Go to the Channel layer palette and Command/Ctrl + click on the Lens Blur channel, this will make a selection of the white tones in the channel.
With our selection active, we’ll go to the Layers Palette and hold down the ALT key, while we press down the adjustment layer button, choose Gradient from the drop-down list. A dialog window will appear and we’ll name the Gradient Fill layer soft light – Lens Blur inverted. Set the blending Mode to Soft Light and click OK.
A Gradient editor window will appear and the only thing we’ll change are the colors, so click on the gradient color and a new dialog window will appear. Select the lower left arrow and then click on the color box, a color picker window will appear. We are going to make the color a neutral gray (50%), reason is since we set the layer blending to soft light, a neutral gray will be 100% hidden. Fill the color with the following RGB values: 128, 128, 128. Click OK and we’ll return to the Gradient editor.
Now select the lower right arrow and click on the color, we’ll set the RGB values to: 243, 243, 243.
Click on the top arrows on both left and right and check if they are set at 100% Opacity, and then click OK, we’ll now return to the gradient fill option.
Click on the top arrows on both left and right and check if they are set at 100% Opacity, and then click OK, we’ll now return to the gradient fill option.
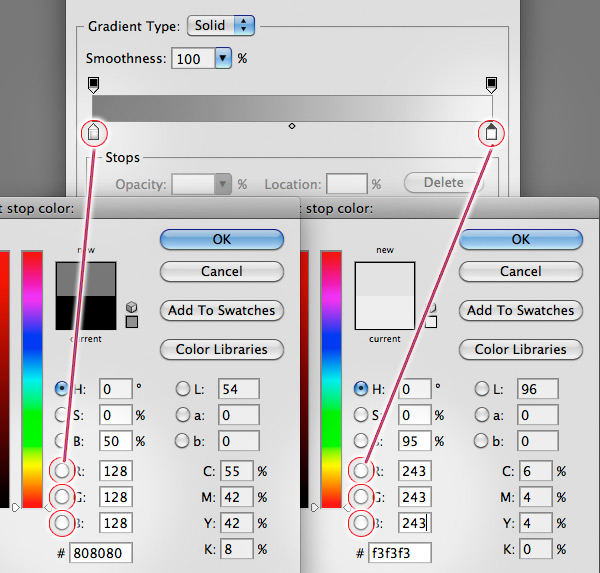
In the Gradient Fill dialog, we’ll leave the Style to Linear, angle to 90, Scale 100, Revers and Dither unchecked and Check Align with layer. Click OK and our gradient is now finished.
Step 13
There is one more thing I want to add to the background photo, before we start adding the other elements to the project. I want to darken the highlight in the center of the ocean, so Lets us make a new Layer, and we’ll do so by ALT + click on the layer button in the Layers Palette (Shortcut is Command/Ctrl + SHIFT + N).
Name the layer Darken – 20% since we are going to set the Blending to Darken and Opacity 20%, click ok when done.
Select the brush tool and set the size at about 900px and the hardness 0%, set your color RGB values: 78, 116, 152. and set brush opacity to 100%
Tone down the highlight in the center of the ocean, just below the shore, see screenshot for reference of the brushed area.
When finished, your result should look like my screenshot. Save the file as a Nutty_Boat_Trip-01.PSD or something better

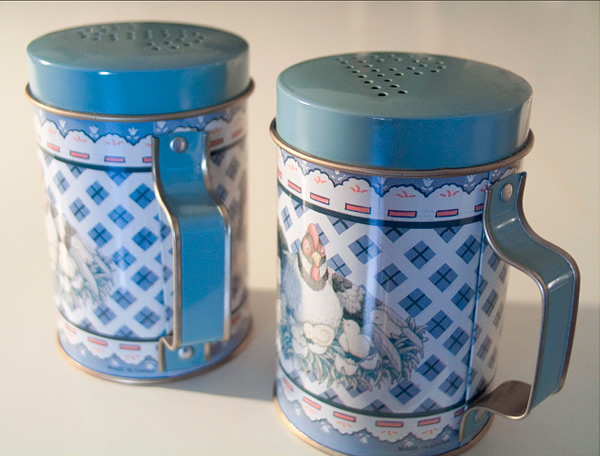
Step 14 – Flour Shakers
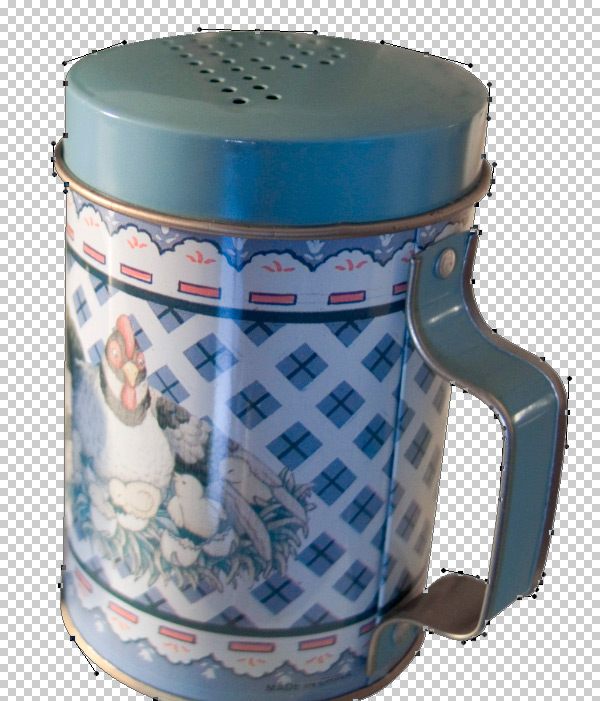
Now we can finally focus on the other elements of our project, and we’ll start by focusing on the Flour Shakers photo, since it’ll be used as the boat for our squirrels. Let’s open the filed called “kitchen_tools_09.jpg” in Photoshop. The first thing you’ll notice is the image lacks a color profile, so go to edit > assign color profile. In the dialog window select a Adobe RGB 1998 color profile and click OK.
We’ll only be using the right Flour shaker, so we can crop the canvas closer around the right shaker. To achieve a similar result as mine, you can use Canvas Size… feature under top menu > Image > Canvas Size… Use the following values W:1546 x H:1803 pixels.

Next we’ll be cutting out shaker with the help of the Pen tool. If you’re not familiar with the basics of the Pen Tool, I would recommend the free beginner guide to Pen Tool by Martin Perhiniak at psdtuts + ,tutorial here.
Double click on the background layer, and rename it to Flour Shaker, select the layer and add it to a Layer Set named flour shaker base (shortcut Command/Ctrl + G). Let’s start creating a path around the right Flour Shaker, and remember to include a path of the insides of the handle. When done, Command/Ctrl + click on your path to make a selection of your path and then click the Mask icon in the layers palette. See screenshot for comparison.
Step 15
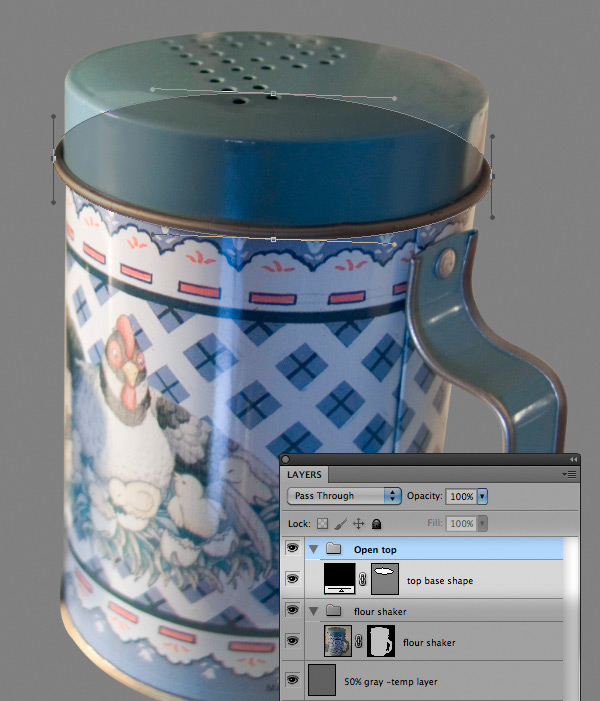
Next step we’ll focus on removing the top of the shaker, since we need to make it look open, so our Furry friends can sit inside. Let’s create a new background layer below the Shaker layer, and fill it with 50% gray, it’s just temporary layer, since we’re going to do adjustment to the flour shaker and it’s hard to work with the transparent blocks as a background. Use fill tool (shortcut shift + F5) and select fill with 50% gray.
We’ll make a shape layer for our selection, so let’s use the Ellipse tool (shortcut U) to shape our top base. We’ll want to include the outer metal ring in our shape path, because we’ll be needing it for the next step. If you need to make some adjustment to the path itself, use the Direct Selection Tool from the Tools panel (shortcut A).
When finished covering the top area with the Ellipse tool, rename the shape layer to top base shape and add it to a new Layer set named Open top See screenshot for selection comparison.
Step 16
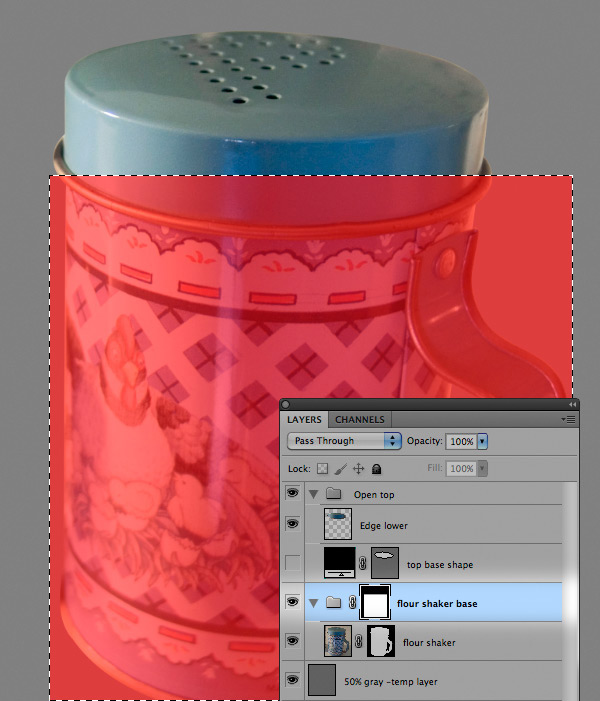
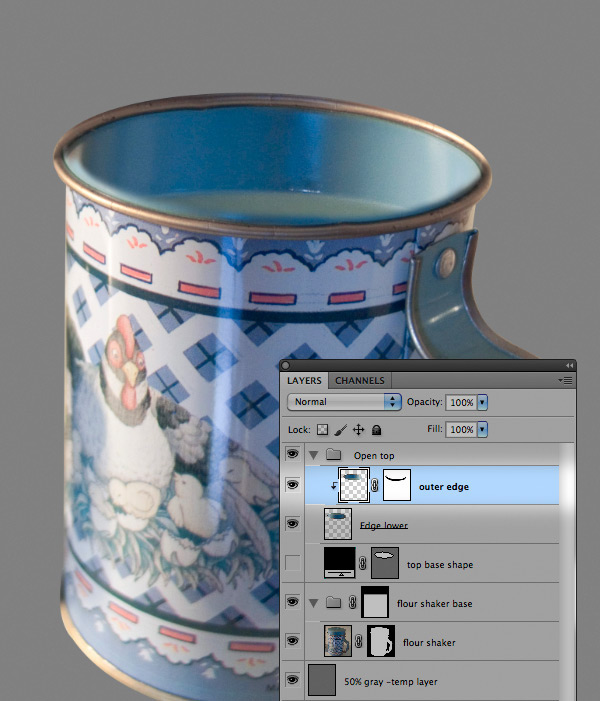
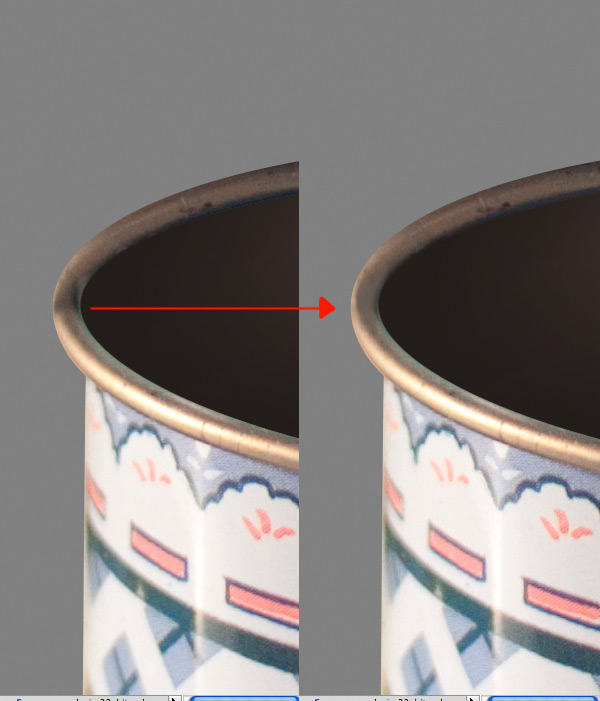
Now Command/Ctrl + click on the Top base shape layer, to make a active selection of the shape, and let’s hide the shape layer Top base shape by clicking the eye on the left. While the selection is active, select the flour shaker layer, and use the layer via copy function (shortcut Command/Ctrl + J). Rename the new layer Edge lower and move it to our Layer set Open Top. Reason for this is we will be needing parts of the top to fix the outer edges of the flour shaker. Lets add a Mask to our flour shaker base layer set, so it won’t interfere with the next steps.
Now make a duplicate of the newly created edge lower layer and rename it outer edge. Select the transform tool while having the new layer selected (shortcut Command/Ctrl + T) and Rotate the outer edge layer 180 degress. Click the num pad Enter key to accept the rotation (FN + Enter key if you’re using a laptop)
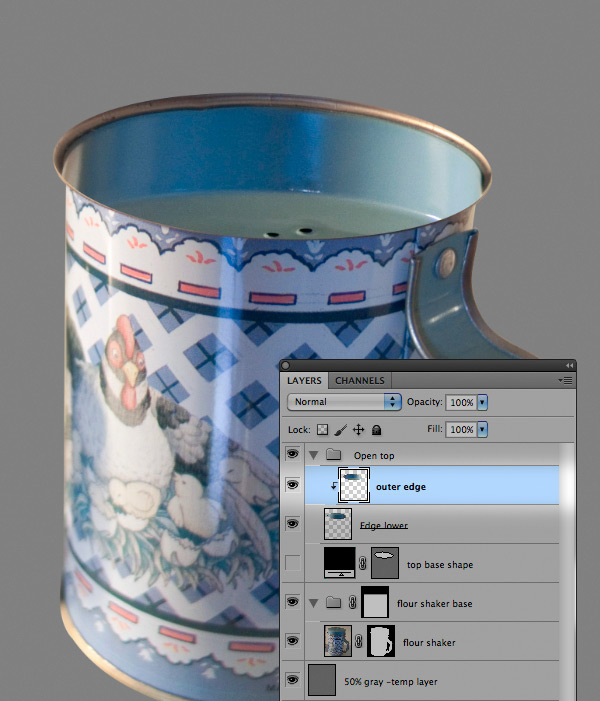
Put a layer Mask on the outer edge layer and Mask out the lower parts of the image to reveal the Tin shaker boarder. See screenshot for comparison.
Step 17
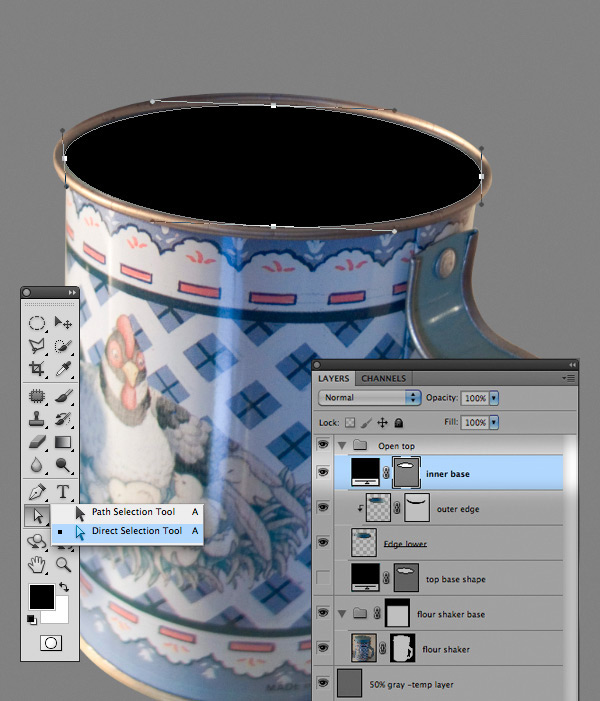
For the next step, we’ll focus on the inner shape to make it look like the Flour shaker is open. You may notice that the edges of the Flour Shaker don’t look very realistic, but we’ll focus on fixing these parts later on
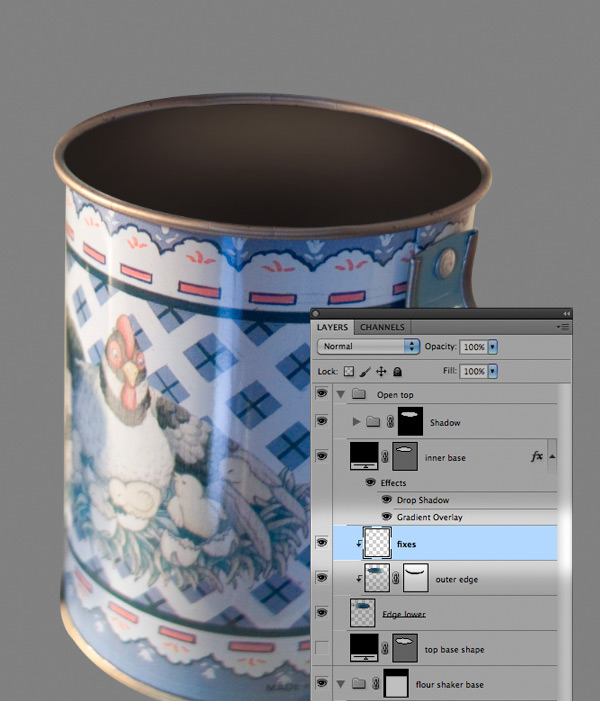
We’ll be needing the Top Base shape shape layer for the inner form, so duplicate the layer and rename it inner base. Use the transform tool (Command/Ctrl + T) and scale it to fit the inside the ring. You’ll notice it wont fit perfectly, so use the Direct Selection Tool to fix the path anchor points. See screenshot for comparison.
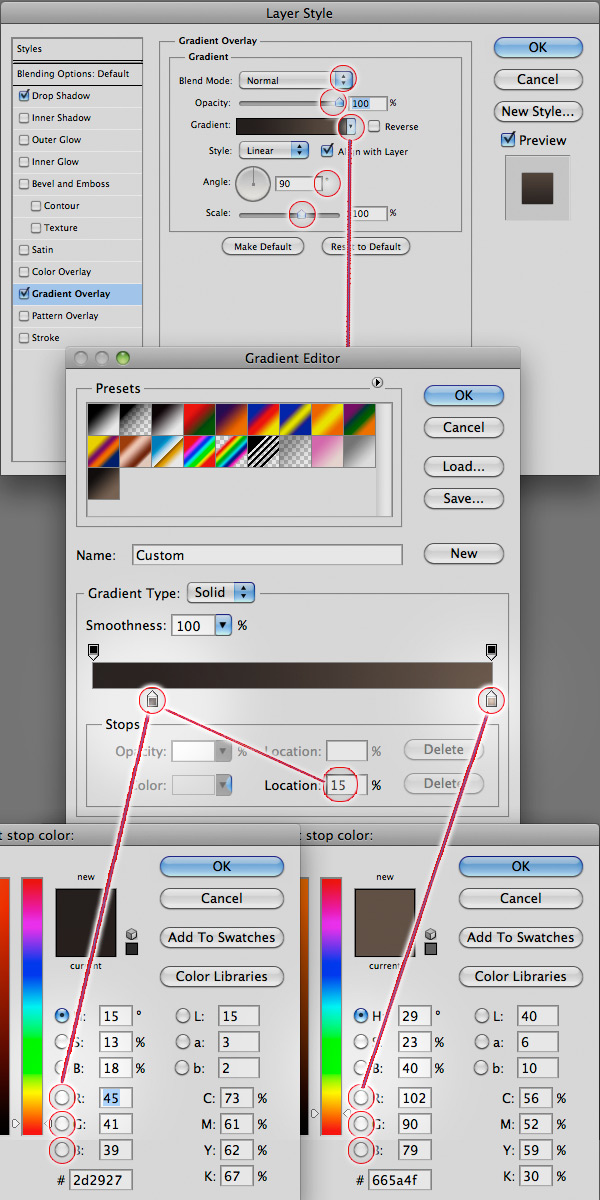
When pleased with the result, we’ll add a Layer Stylize filter called Gradient overlay and a Drop shadow. We’ll start with the Gradient overlay and set the blending to normal, opacity to 100%, Angle at 90°, scale set to 100%. Click on the gradient fill and let’s define the dark color to R:45, G:41, B:39 and set lower arrow at location 15%. Define the bright color of the gradient to R:102, G:90, B:79 and click ok.
Next we’ll add the drop shadow on our layer, to avoid a bright edge on the upper side of our layer. Set the Blend mode to multiply, opacity to 75%, Use global light and check if it’s set to 30°, distance 0, Spread 0 and size 2.
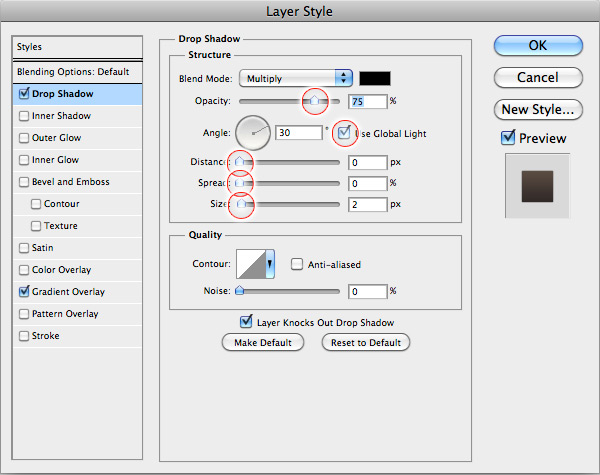
When you’ve added the stylize features to your Inner shape, your result should look similar to my screenshot. note if the gradient if a bit off on your version, you can always click the gradient overlay tab in the layer stylize menu, and then move the gradient with your mouse on stage, to make it more suitable.

Step 18
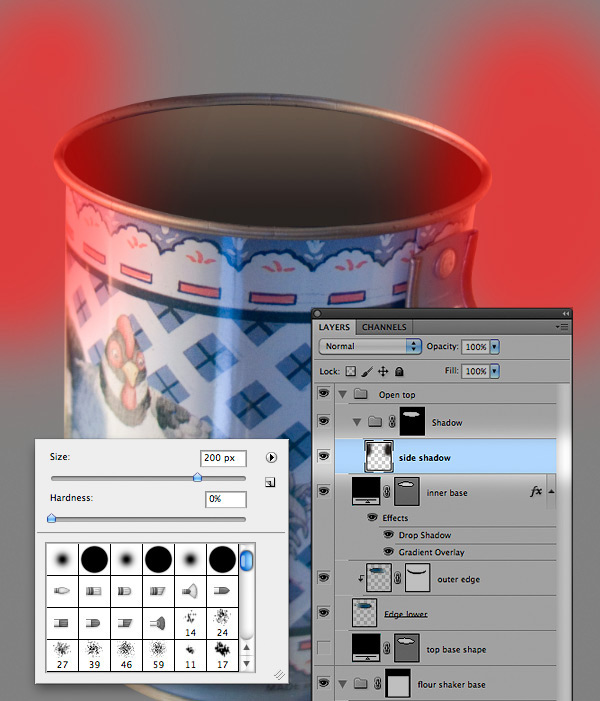
It’s time to add shadows to our inner shape, So let’s start by making a active selection of our shape layer Inner Base, next step is to make a new layer (Command/Ctrl + Shift + N) and name it Side shadow. Have the new layer selected and the selection active, let’s put the new layer in a new Layer Set (Command/Ctrl + G) and name it Shadow. Now use the active selection as a Mask for the new layer set, by click the Mask icon in layers palette.
Now let’s use the brush tool and paint to lines at the sides, select a large brush about 200px size, 0% hardness and set the color to R:39 G:35 B:35 and start painting the sides.
When finished, your result should look similar to my screenshot
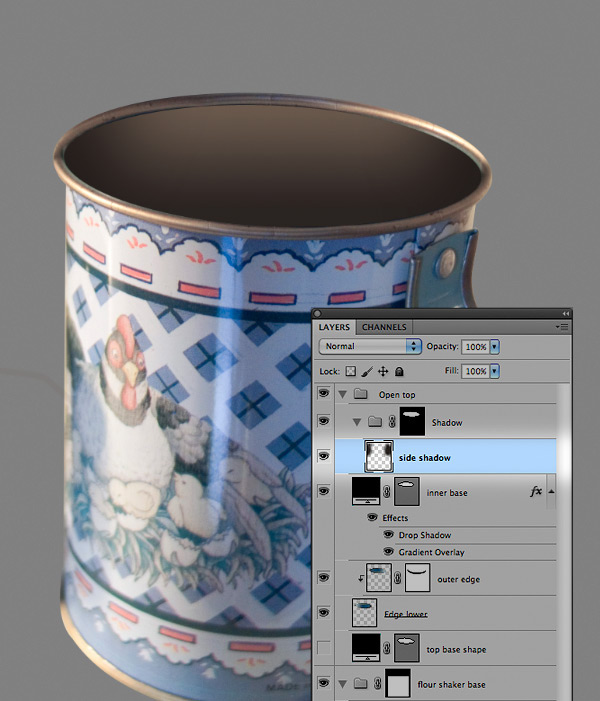
Let’s make one more layer inside the Layers set Shadow and name the new layer top shadows. we’ll use this layer to paint a bit more shadow inside the Flour shaker, especially under the upper edge and lower side. Use a soft brush and set your color to R:38 G:34 B:32. See screenshot for comparison

Step 19
We are at the final step of fixing our flour shaker, so we’ll now be focusing on fixing the flour shaker edges as mentioned earlier. We’ll need to make a new layer and name it Fixes and place it as a clipping Mask above our Outer edge layer.
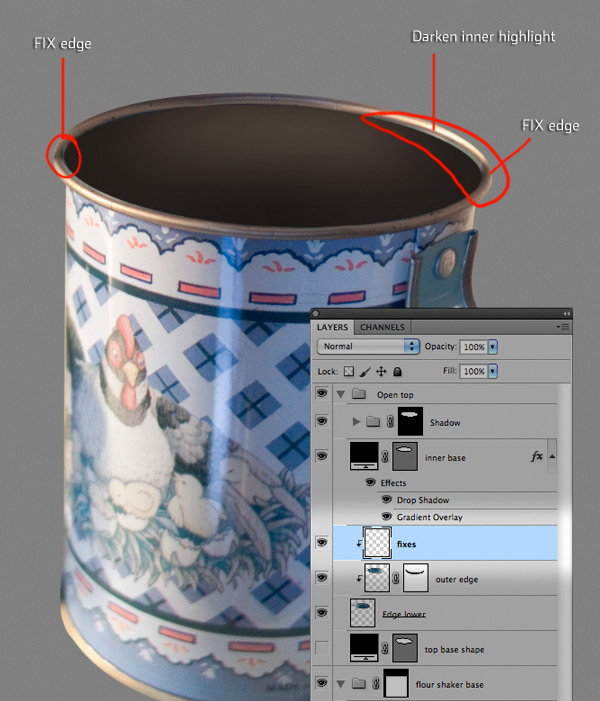
We’ll be using the brush tool, so choose a small brush size about 14px and set the opacity to 20%, use the color picker tool shortcut (ALT + click, when brush tool is selected) to choose nearby colors, when fixing the edges. See screenshot for comparison.
When finished and pleased with the fixes, your result should look similar to mine or better. Save the file as flour_shaker.PSD
Step 20 – Squirrel Ben Gray
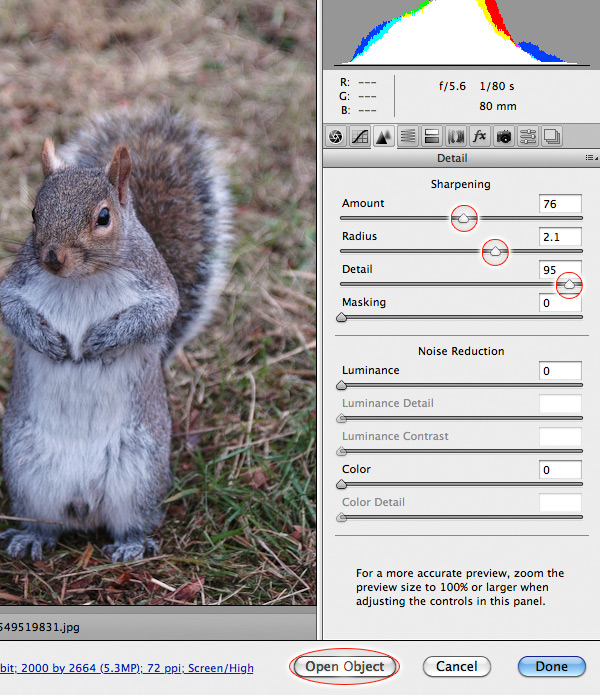
Yay we are finally finished with the flour shaker and can now focus on our furry friends. We’ll first focus on our gray Squirrel friend, which we’ll call Ben Gray from now on, so lets open the file named 110549519831.jpg in Camera RAW.

Only thing we’ll focus on doing in Camera RAW, is to add sharpness to little Ben. Select the Detail tab and under sharpening set amount to 76, Radius 2.1 and Detail 95. When done, open the image into Photoshop as a smart object.
Step 21
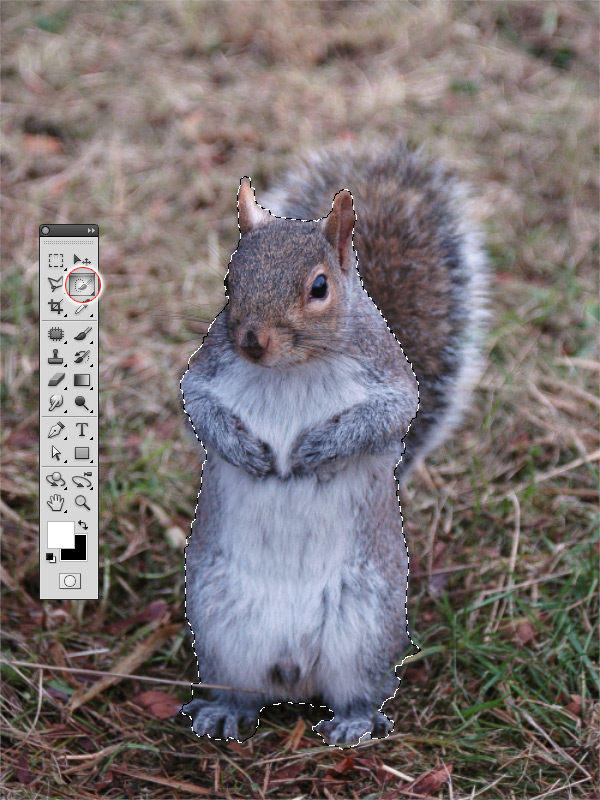
We’ll need to cut out Ben Gray from the background, and for this we’ll use the Quick Selection tool (W). Make a selection of the squirrel and try to see if you can get your result to look similar to my attached screenshot. If you accidentally select the area outside the squirrel, then you adjust it by holding down the ALT key and mark the selected area to be removed.
Step 22
Since we have been using the Quick Selection Tool, we’ll need to adjust the edges of our selection. We’ll do this by having our selection active, and go to the Mask palette and choose the Add a pixel Mask, then choose Mask Edge.
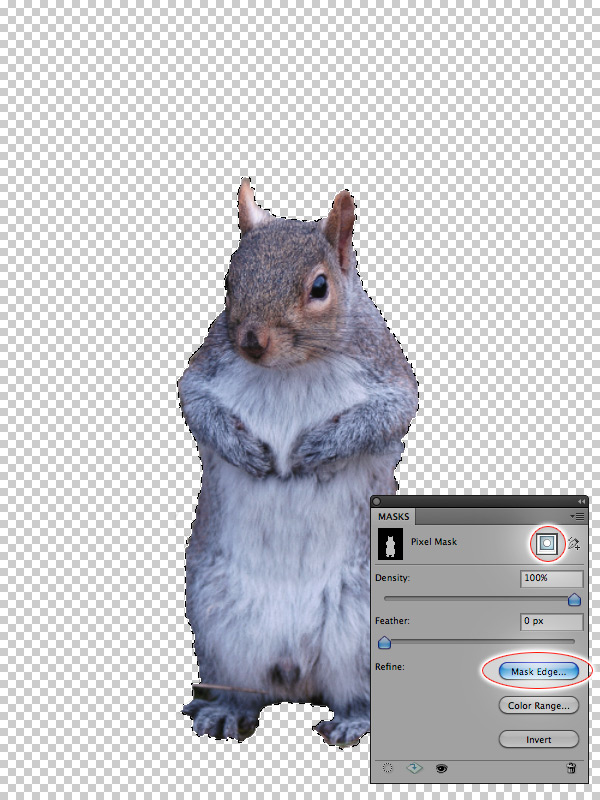
In the Refine Mask popup window, we’ll only use the Smart Radius feature, under the Edge detection.
Apply a value 2 to the Smart Radius and click ok. You’ll notice on the screenshot the difference it makes to the edges. I would recommend everyone to try the Refine Edges feature and play around with the various settings to become more familiar with them.
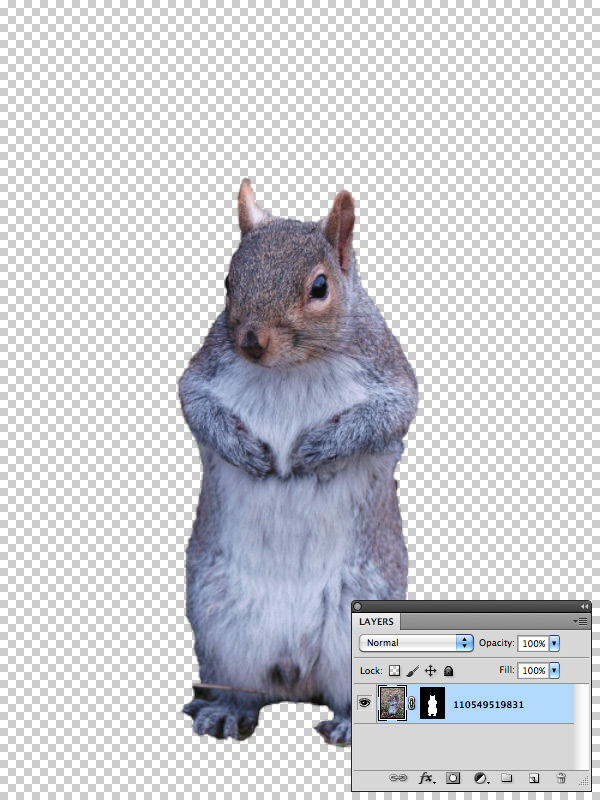
Now Ben Gray is ready for the main canvas file, so we’ll save our furry Squirrel as “Squirrel-Ben Gray.psd” and focus on his friend to be included.
Step 23 – “Eddie the Nut”
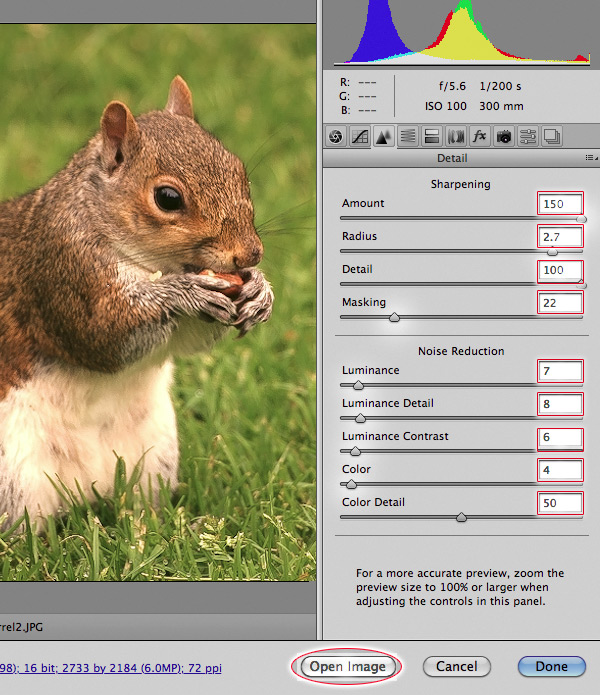
Let’s open the file hotblack_20070610_squirrel2.JPG in Camera Raw plugin, and we’ll focus on sharpening our furry friend. We’ll be calling our new friend Eddie the nut, or just Eddie ;-)
In the Camera Raw window, choose the tab called Detail and fill the following values into the fields. Amount 150, Radius 2.7, Detail 100 and Masking 22.
We’ll also add Noise reduction to the photo, so fill the following values into the fields. Luminance 7, Luminance Detail 8, Luminance Contrast 6, Color 4, Color Detail 50. When done, open up the image in Photoshop.
Step 24
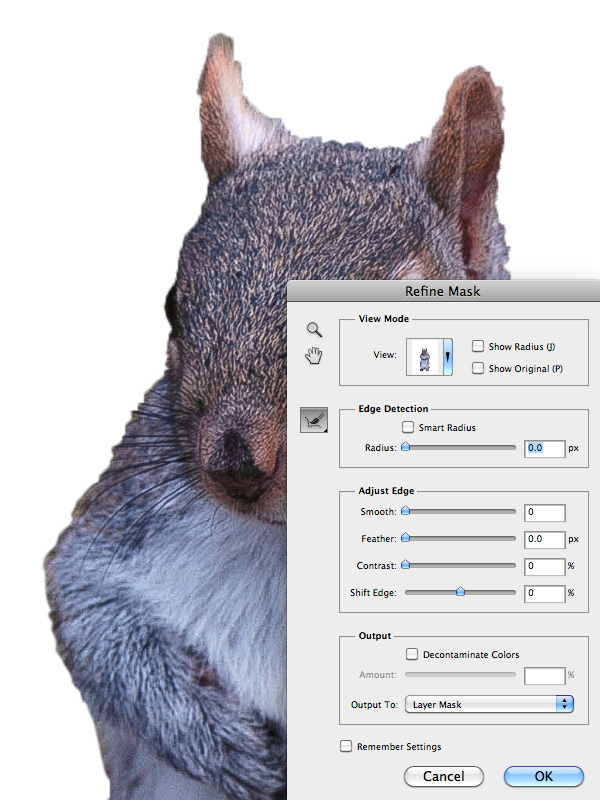
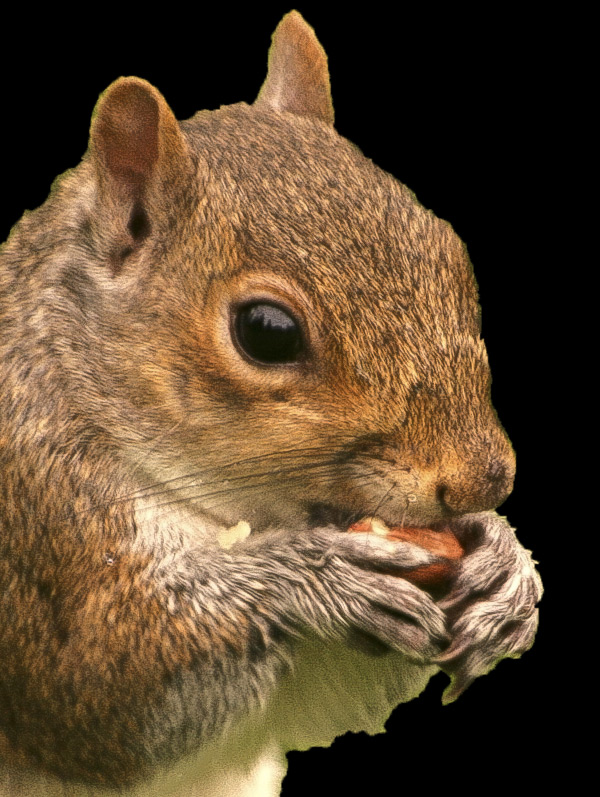
In Photoshop we’ll need to Mask out the background, since Eddie the Nut is needed on our main canvas, sailing their jolly boat. So let’s start out by duplicating our background layer and name it Retouch, now let’s use the Quick Selection Tool and make a selection on Eddie. When finished, your selection should look similar to the attached screenshot.

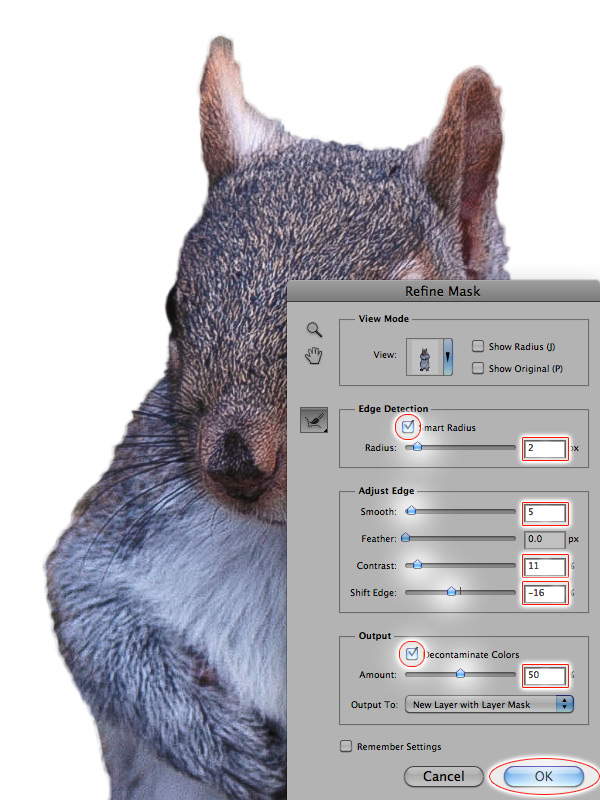
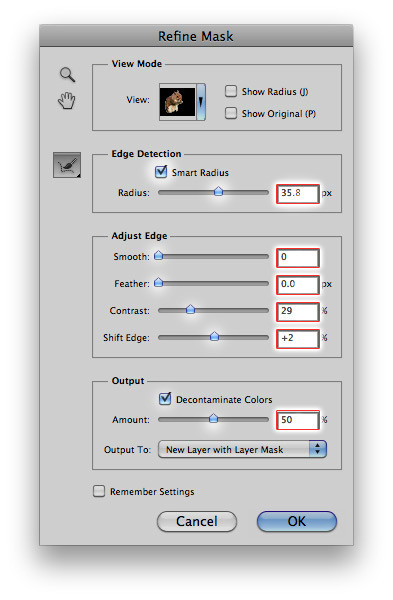
We’ll need to refine our Mask to make the edges look more natural, so let’s open up the refine Mask. I’ve attached a closeup screenshot to show how the raw Mask selection looks like, before we’ll refine the it.
We’ll start by adjusting the Smart Radius under the Edge Detection, set the value to 35.8, adjust the Contrast to 29% and Shift edge + 2%. Last option is under the Output, enable Decontaminate Colors and set the Amount to 50%.
Your result should look similar to mine

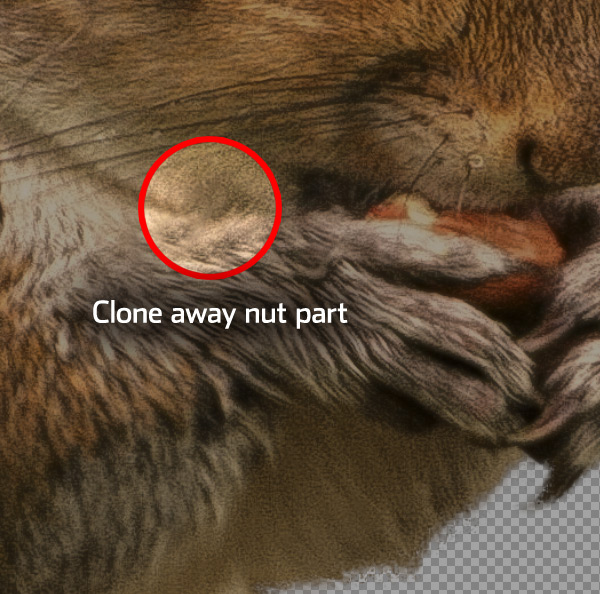
Step 25
Since our friend Eddie is in the progress of eating his nut, my eye is a bit annoyed by the mess he’s done on his arm, so let’s create a new empty layer and name it clone layer. Select the Clone tool (shortcut S) and clone away the Nut on his arm. The Clone tool works by defining a source area, by holding down the ALT key and clicking which area to clone from. See screenshot for comparison.
Step 26
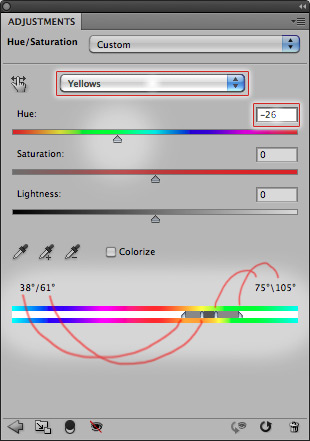
As you may have noticed, our friend Eddie is rather green on his lower parts of his body, due to the reflection of the grass. We’ll fix this easily by adding a Hue/Saturation adjustment layer.
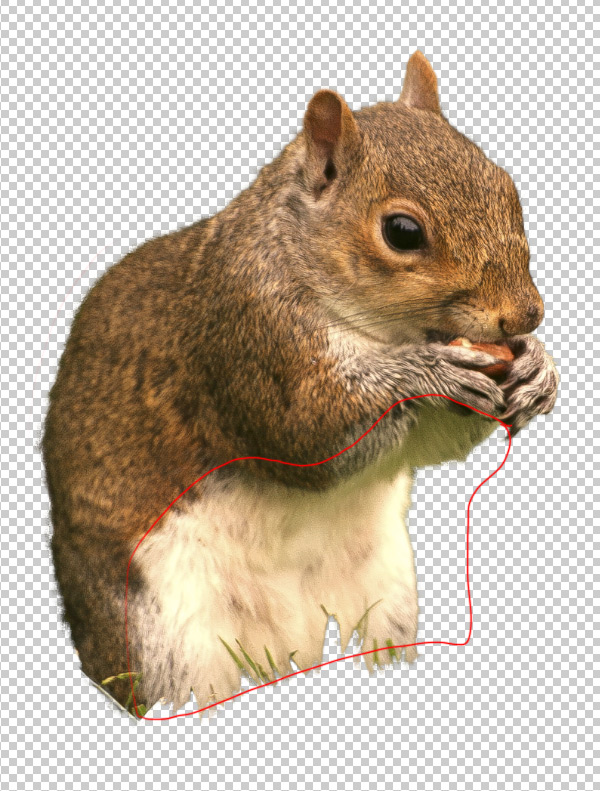
Create a new Hue/Saturation adjustment layer and place it at the top of the layers. Select only the Yellow channel in the drop-down option, and set the hue to -26. Adjust the sliders below starting with the far left set to 38°, second left set to 61°. The right slider at 75° and the far right at 105°
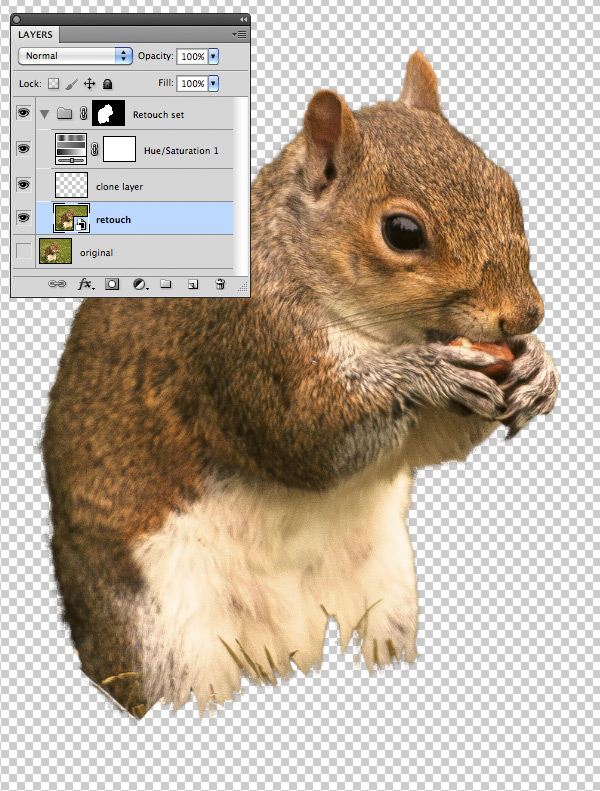
When done, your result should look as my screenshot. To keep our layers clean, you can noticed I’ve created a new Layers set named Retouch Set and placed the layers inside. The Layer Mask we created earlier, on the Retouch layer, I’ve moved on the Layer set instead, you can easily do this by drag’n drop the Mask on the layer set.
Step 27
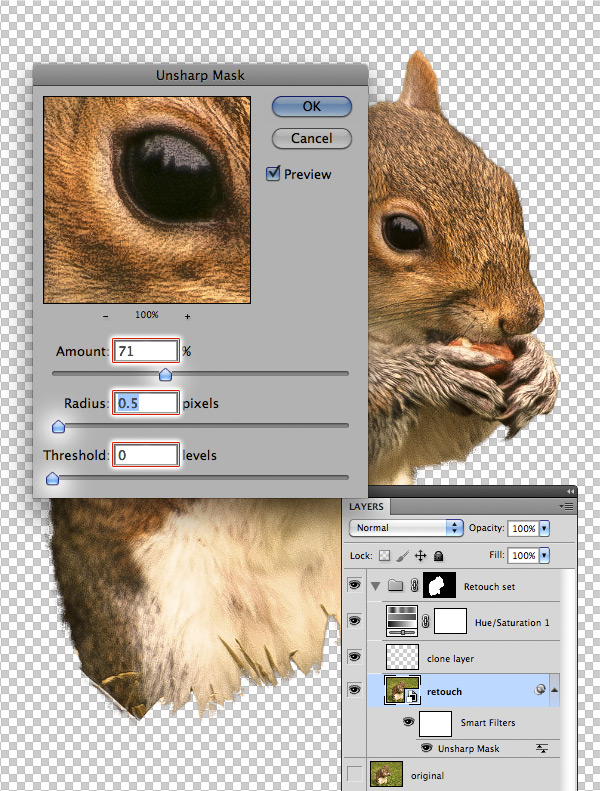
We are at the final stage of Eddie the Nut, and I want to add the final touches to him, before we’ll call it a wrap. Let’s apply an Unsharpen Mask to our Retouch layer, BUT before we do so, convert it to a Smart Object. Reason for this, is so we can adjust the applied filter settings, if not pleased with the result later on and it’s nondestructive, a word we love. Apply the Unsharp Mask and add the following values, amount 71%, Radius 0.5 and Threshold 0.
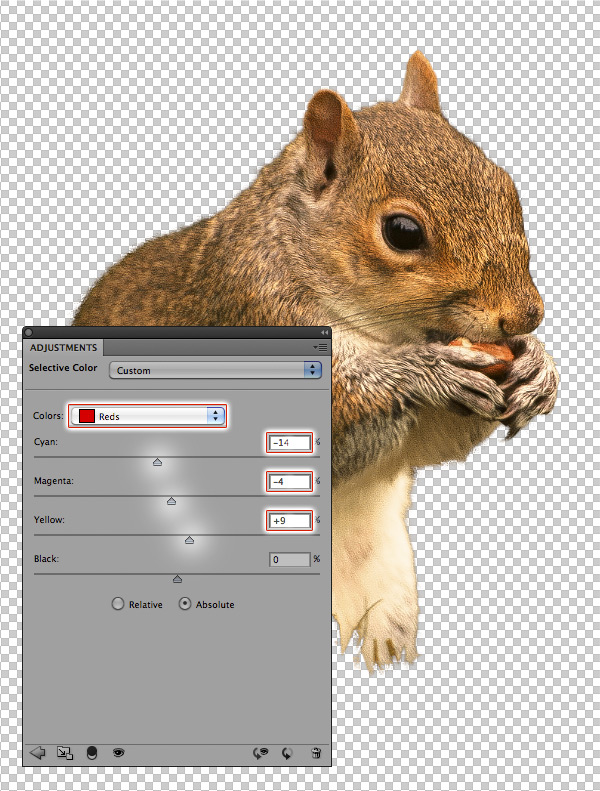
After applying our Unsharpen Mask, we are going to boost the colors a bit, by applying a Selective color adjustment layer. Select the Reds color range and apply the following values. Cyan -14%, Magenta -4%, Yellow + 9%.
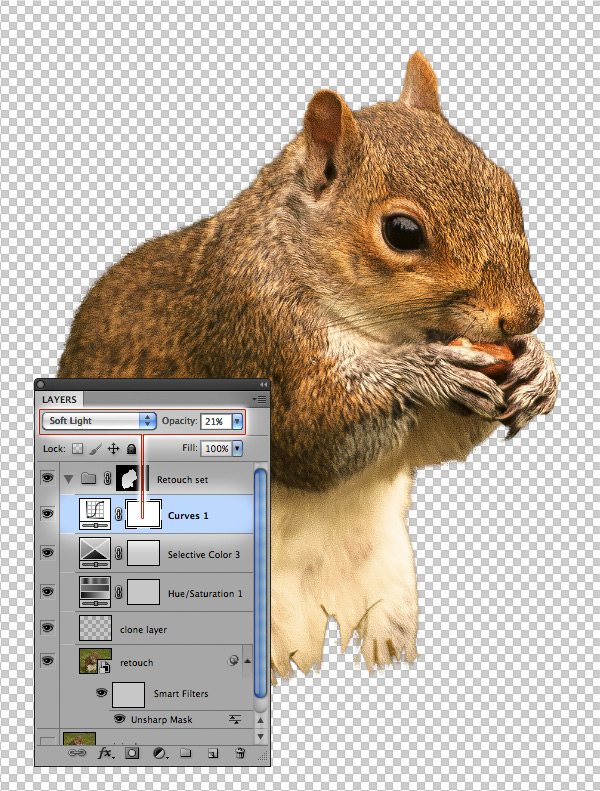
We are going to give Eddie a contrast boost too, so we’ll apply a Curves adjustment layer and set the layer blending to Soft Light and set the opacity at 21%.
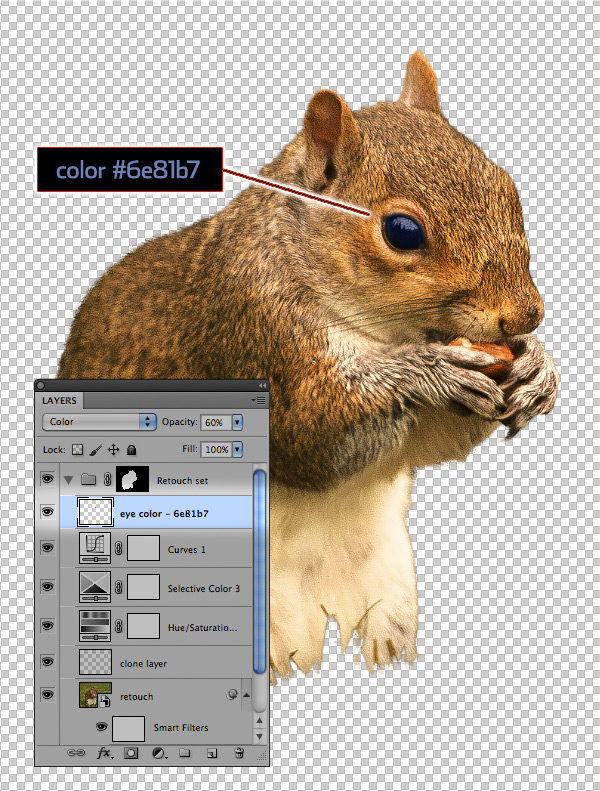
The final setting we’ll apply before focusing on other elements of our main canvas, is to change the color of Eddie’s eye. Let’s create a new empty layer named Eye Color and set the blending mode to Color. Select the Brush tool and paint the eye with the color #6e81b7 or RGB value, R:110, G:129 B:183.
Our Eddie friend is now ready and we can save as Squirrel-Eddie the Nut.psd and close our file.
Step 28 – a Faroese hat
Now it’s time to focus on the hats to be worn by our furry friends, hopefully to make them appear more purdy, and why not use hats for the task? – The Faroese hat will suit Ben Gray fine.
Let’s start out with opening the file _MG_0781_by_KSB.jpg, and open it up in Photoshop. Use the Quick selection tool to make a selection of the hat.
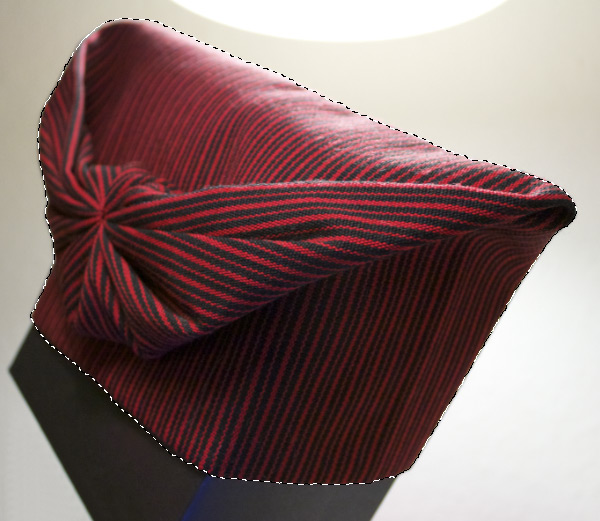
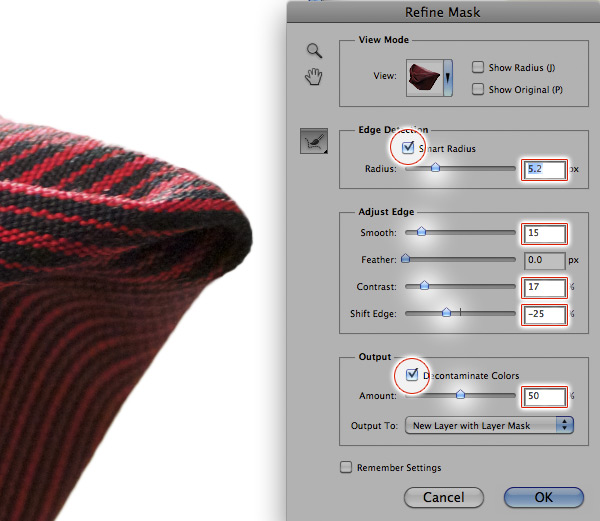
When pleased with your selection, let’s add a Mask and refine it, use the following values for the Mask. Enable Smart Radius and set value 5.2px. Under adjust edge, set Smooth at 15, Contrast 17% and Shift edge -25%. Enable Decontamination Colors and leave it at the default 50%.
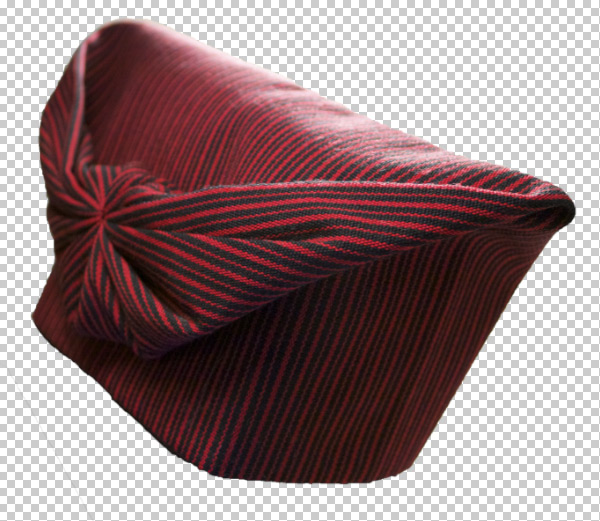
Our hat is now ready and let’s save and close the image to work on the next hat.
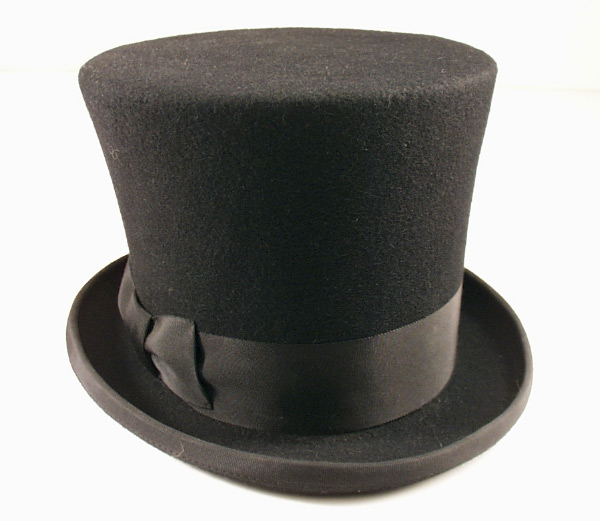
Step 29 – Elegant Hat
Eddie the nut will also be needing a hat, so we have gone for a elegant choice to suit his nutty behavior. So let’s prepare it for him ;)
Start out with opening the file tophat0007.jpg, and open it up in Photoshop. We’ll need to flip the canvas horizontal, and we’ll do so by going to the top menu image > image rotation > and choose flip canvas horizontal. Now we’ll use the Quick selection tool and make a selection of the hat
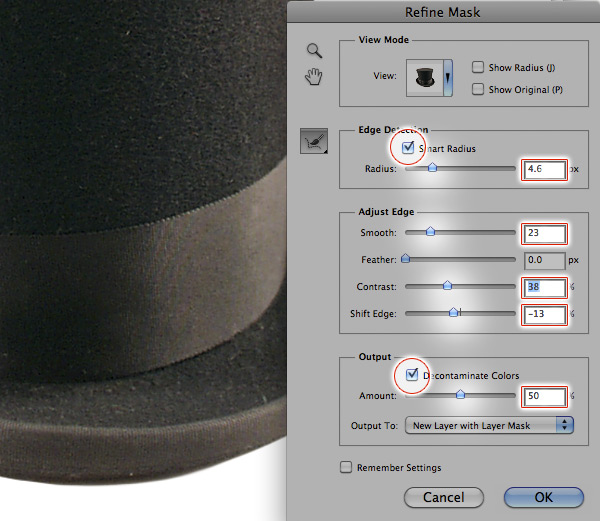
When pleased with your selection, let’s add a Mask and refine it, use the following values for the Mask. Enable Smart Radius and set value 4.6px. Under adjust edge, set Smooth at 23, Contrast 38% and Shift edge -13%. Enable Decontamination Colors and leave it at the default 50%.
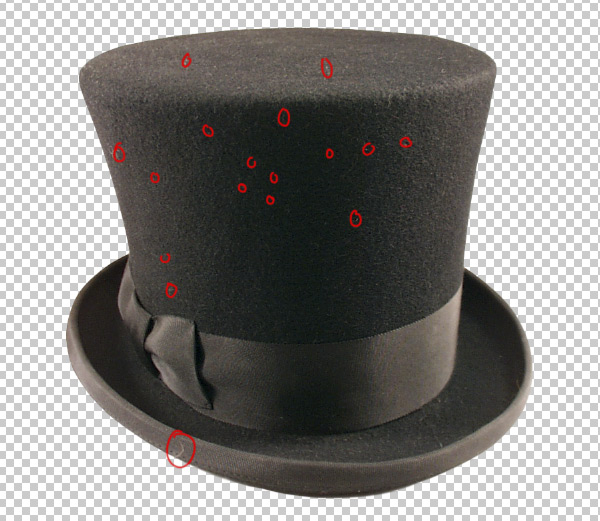
Before we are finished with out hat, let’s make a new empty layer and name it Clone layer, and as you can see on my screenshot, I’ve marked some areas with dust and hair on them, clone them away and we are finished.
Our hat is now ready and let’s save and close the image to finally start working on the big canvas again.

Step 30 – The Nutty Boat Trip
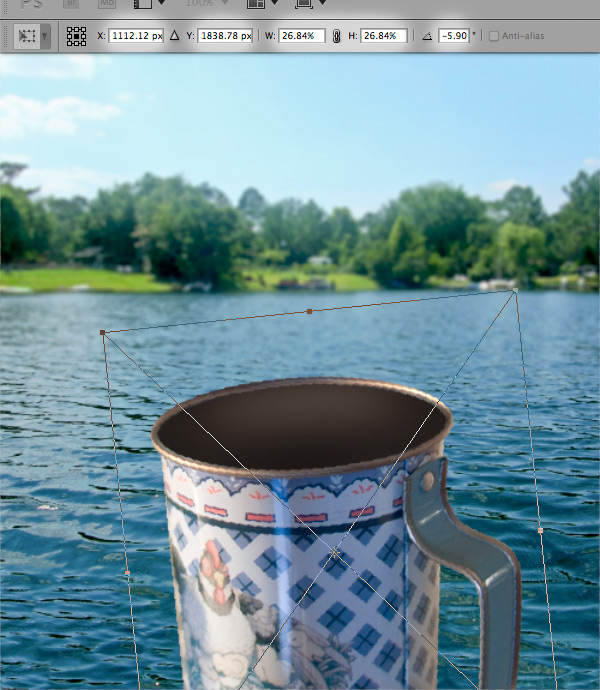
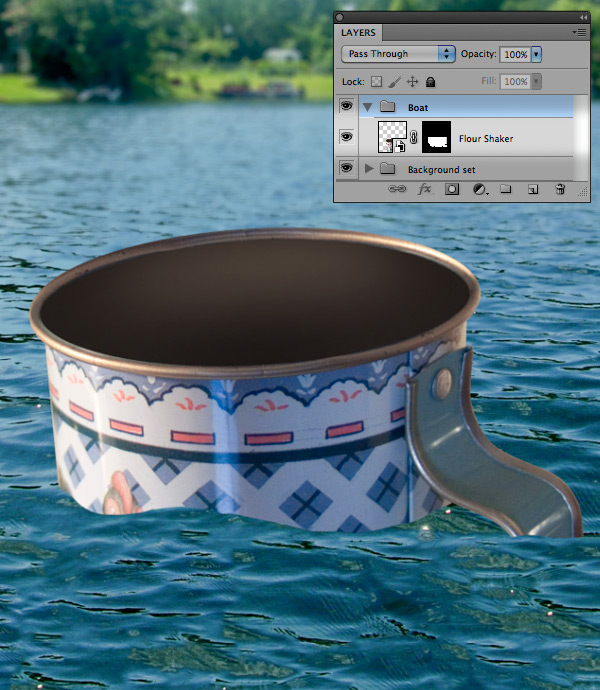
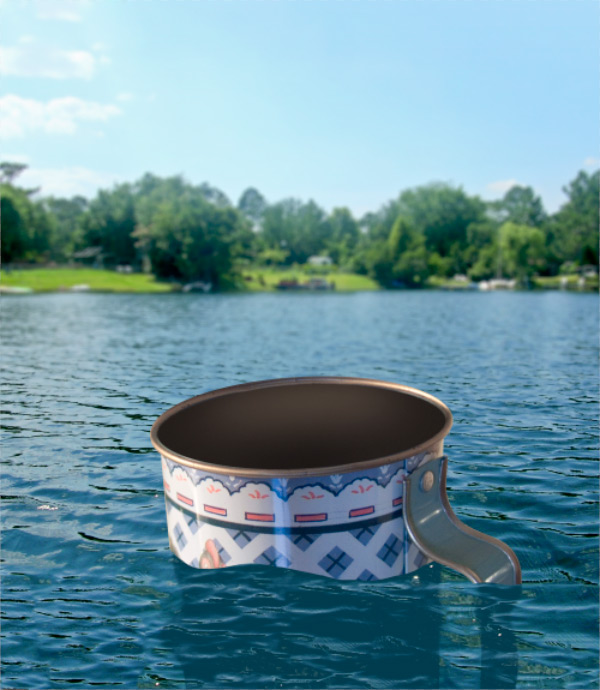
Open our Nutty_Boat_Trip-01.PSD project, and let’s move all the layers into a new Layer set named background. We will now be ready to place the flour shakers we retouched earlier into our scene. We’ll do this by going to the top menu, File > Place… and choose flour_shaker.PSD. Select the Transform object function Command/Ctrl + T and use the following values as seen in the screenshot. X: 1112.12px, Y: 1838.78px, W: 26.84%, H26.84% and angle -5.90. When done, put the Flour shaker in a new layer set named Boat.
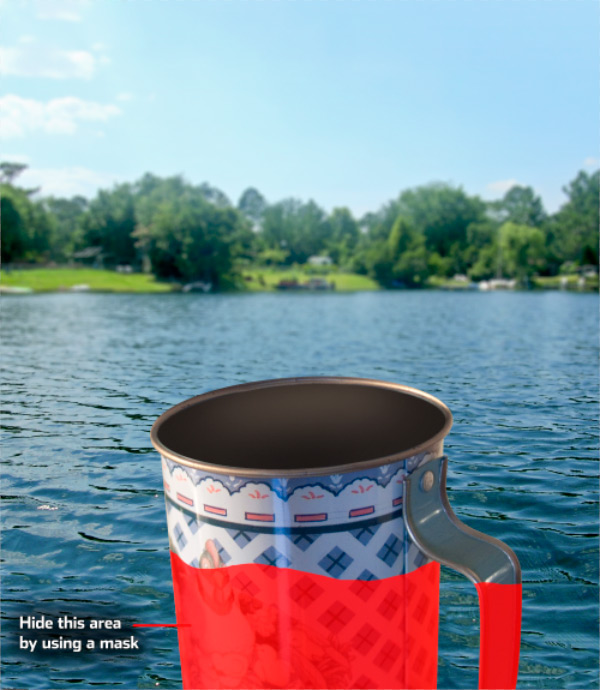
Next step is to Mask away the area, which will be under water, I’ve marked the area to be Masked on my screenshot. Apply a Mask to your Flour shaker layer and start hiding away. Reason for not using the eraser tool, is if we make a mistake, we can’t always fix by adjusting our Mask.
Step 31
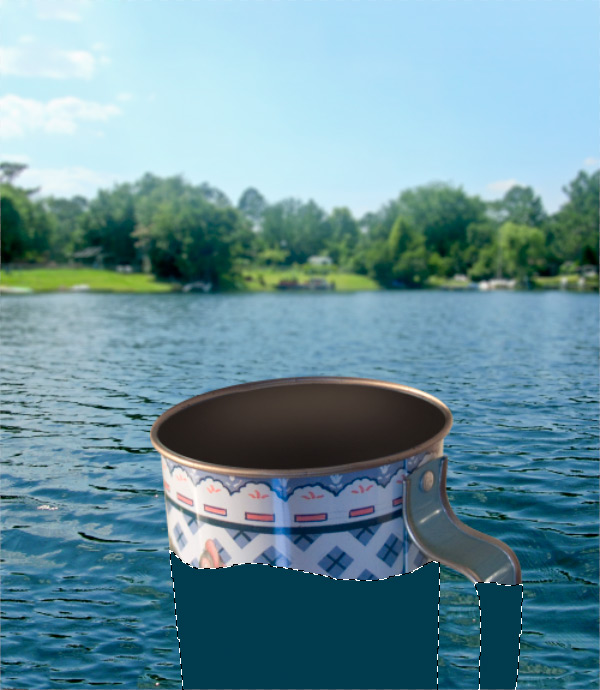
To make the Flour shaker look as if it’s under water, we’ll need to add shadows. Let’s make a active selection of our Flour Shaker layer, by Command/Ctrl + clicking on the layer preview icon, in the layers palette. With a active selection of the whole object, we’ll only need the lower half, so hold down your Command/Ctrl + ALT keys and click on the Mask to remove the upper half from our selection
Let’s create a new layer and call it Underwater shadow and fill it with color #213d4e.
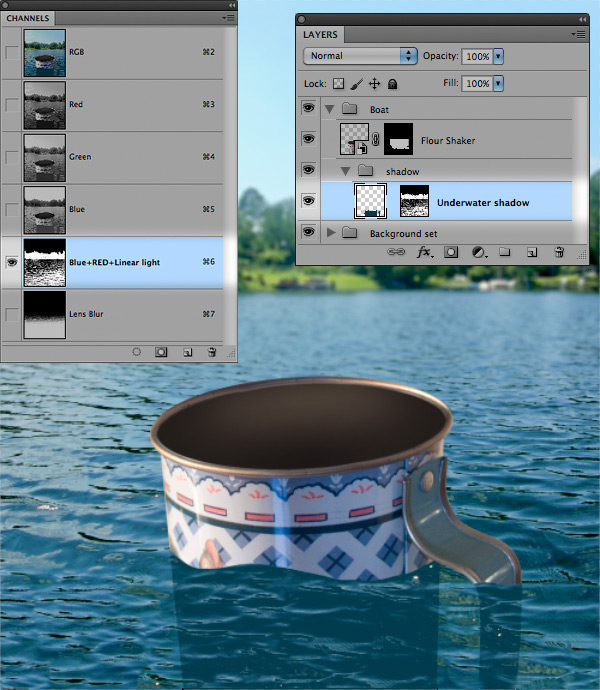
After applying the color fill, we’ll need to reuse alpha channel Blue + RED + Linear light, by Command/Ctrl + clicking on it. When the selection is active, let’s apply it as Mask to our underwater shadow layer. When done, let’s place the layer into a new layer set named shadow. It’s important it’s placed inside our main layer set Boat and be sure it’s below the Flour Shaker layer.
Since the Flour shaker is under water, we’ll need to change the edges and make them less linear, we’ll do this by using the Liquify filter in Photoshop. To putt less strain on the CPU, make a selection of the area to have the Liquify filter applied, and then go to Filters > Liquify….
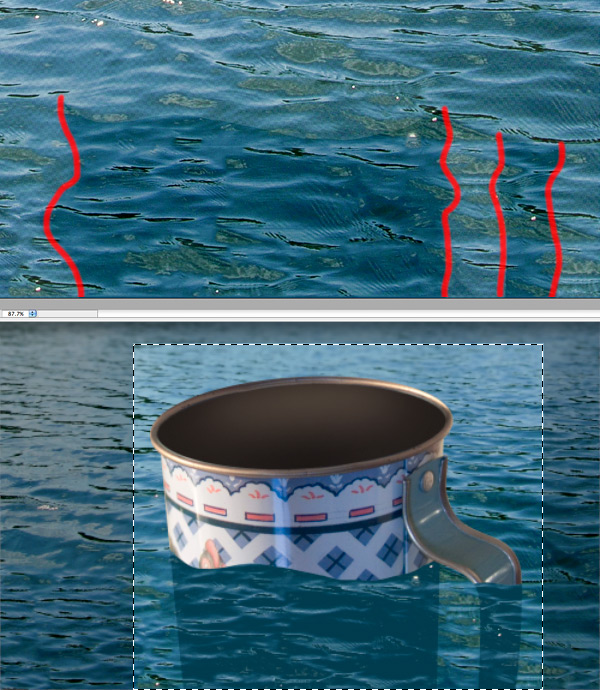
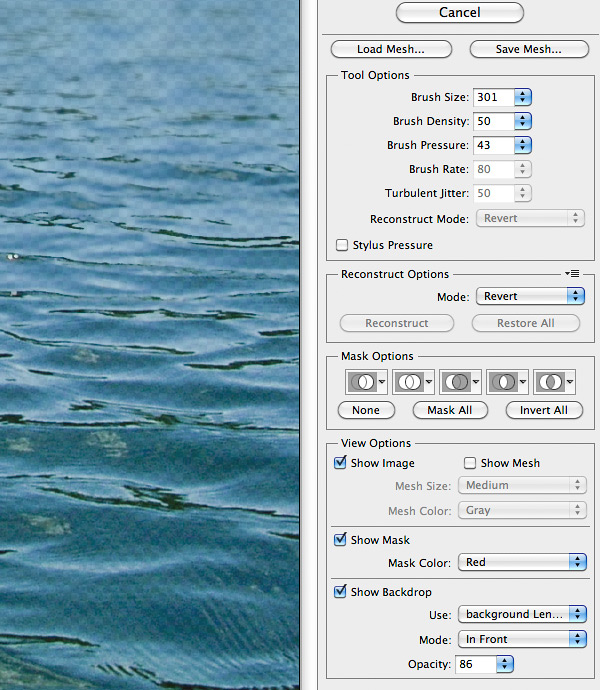
As you can see on my previous screenshot, I’ve marked with lines in which way we want to distort the shape, and to get a preview of the background, you’ll need to activate show Backdrop in the lower area of the Liquify options. Select Show Backdrop and choose the layer background Lens Blur, set mode to in front and opacity about 85. The brush settings you can change to your liking, and try to see if you can get a similar outcome as my screenshot below.
No comments:
Post a Comment